If you’ve ever watched a YouTube video and thought, “This exact moment would make a perfect clip,” you’re not alone. Whether it’s a powerful quote, a funny reaction, or a quick tutorial moment, knowing how to get clips from YouTube videos is a skill almost every content creator needs today.
The problem? Manually scrubbing through long videos, cutting timestamps, and exporting clips can quickly turn into a time-consuming headache. That’s where a modern YouTube clip maker powered by AI can completely change the workflow.
In this guide, we’ll walk through how to clip YouTube videos step by step, from downloading a video safely to uploading it, selecting the best moments, and exporting clean, ready-to-share clips. You’ll also see how AI clips help identify key moments automatically, so you don’t have to watch every second of a video just to find what matters.
If you’re wondering how to get clips from YouTube efficiently, without complicated software or hours of manual editing, you’re in the right place. Let’s break it down and make clipping simple, fast, and even a little fun.
How to download a YouTube video
Before you can start clipping, you’ll need access to the actual video file. While YouTube is built for streaming, there are safe and legitimate ways to download videos if you do it correctly and responsibly.
First things first: always keep YouTube’s terms of service in mind. Downloading videos is generally allowed for personal use, reference, or editing your own content. If you’re working with someone else’s video, make sure you have permission or that the content is cleared for reuse. This matters even more if you plan to share or monetize the clips later.
Use YouTube’s official download options (when available)
YouTube offers built-in download features through YouTube Premium. This option lets you save videos for offline viewing within the platform. While these files can’t always be exported directly, they’re useful if you’re planning clips conceptually or working within YouTube’s ecosystem.
Use trusted third-party tools carefully
If you need an actual video file to upload into a YouTube clip maker, many creators rely on reputable third-party tools that allow you to download videos in common formats like MP4. When choosing a tool, look for ones that:
• Clearly state how they handle downloads
• Don’t require suspicious permissions
• Offer standard video resolutions and formats
Avoid sketchy sites filled with pop-ups or forced downloads. A clean interface and clear instructions are usually good signs you’re in the right place.
Once your video is downloaded and saved to your device, you’re ready for the fun part: turning that long video into short, shareable moments. Next up, we’ll walk through how to upload your YouTube video into the AI clips tool and get everything ready for clipping.
How to upload your YouTube video to our AI Clips tool
Once your YouTube video is downloaded, uploading it into the AI clips tool is refreshingly simple. You don’t need to deal with complicated settings or long prep steps, this part is designed to get you from file to editing mode as quickly as possible.
Start by opening the YouTube clip maker and selecting the upload option. From there, choose the video file you saved earlier and upload it directly from your device, or just copy and paste the YouTube link into our AI Clips tool. The tool supports common video formats, so you won’t need to convert or reformat your file beforehand.
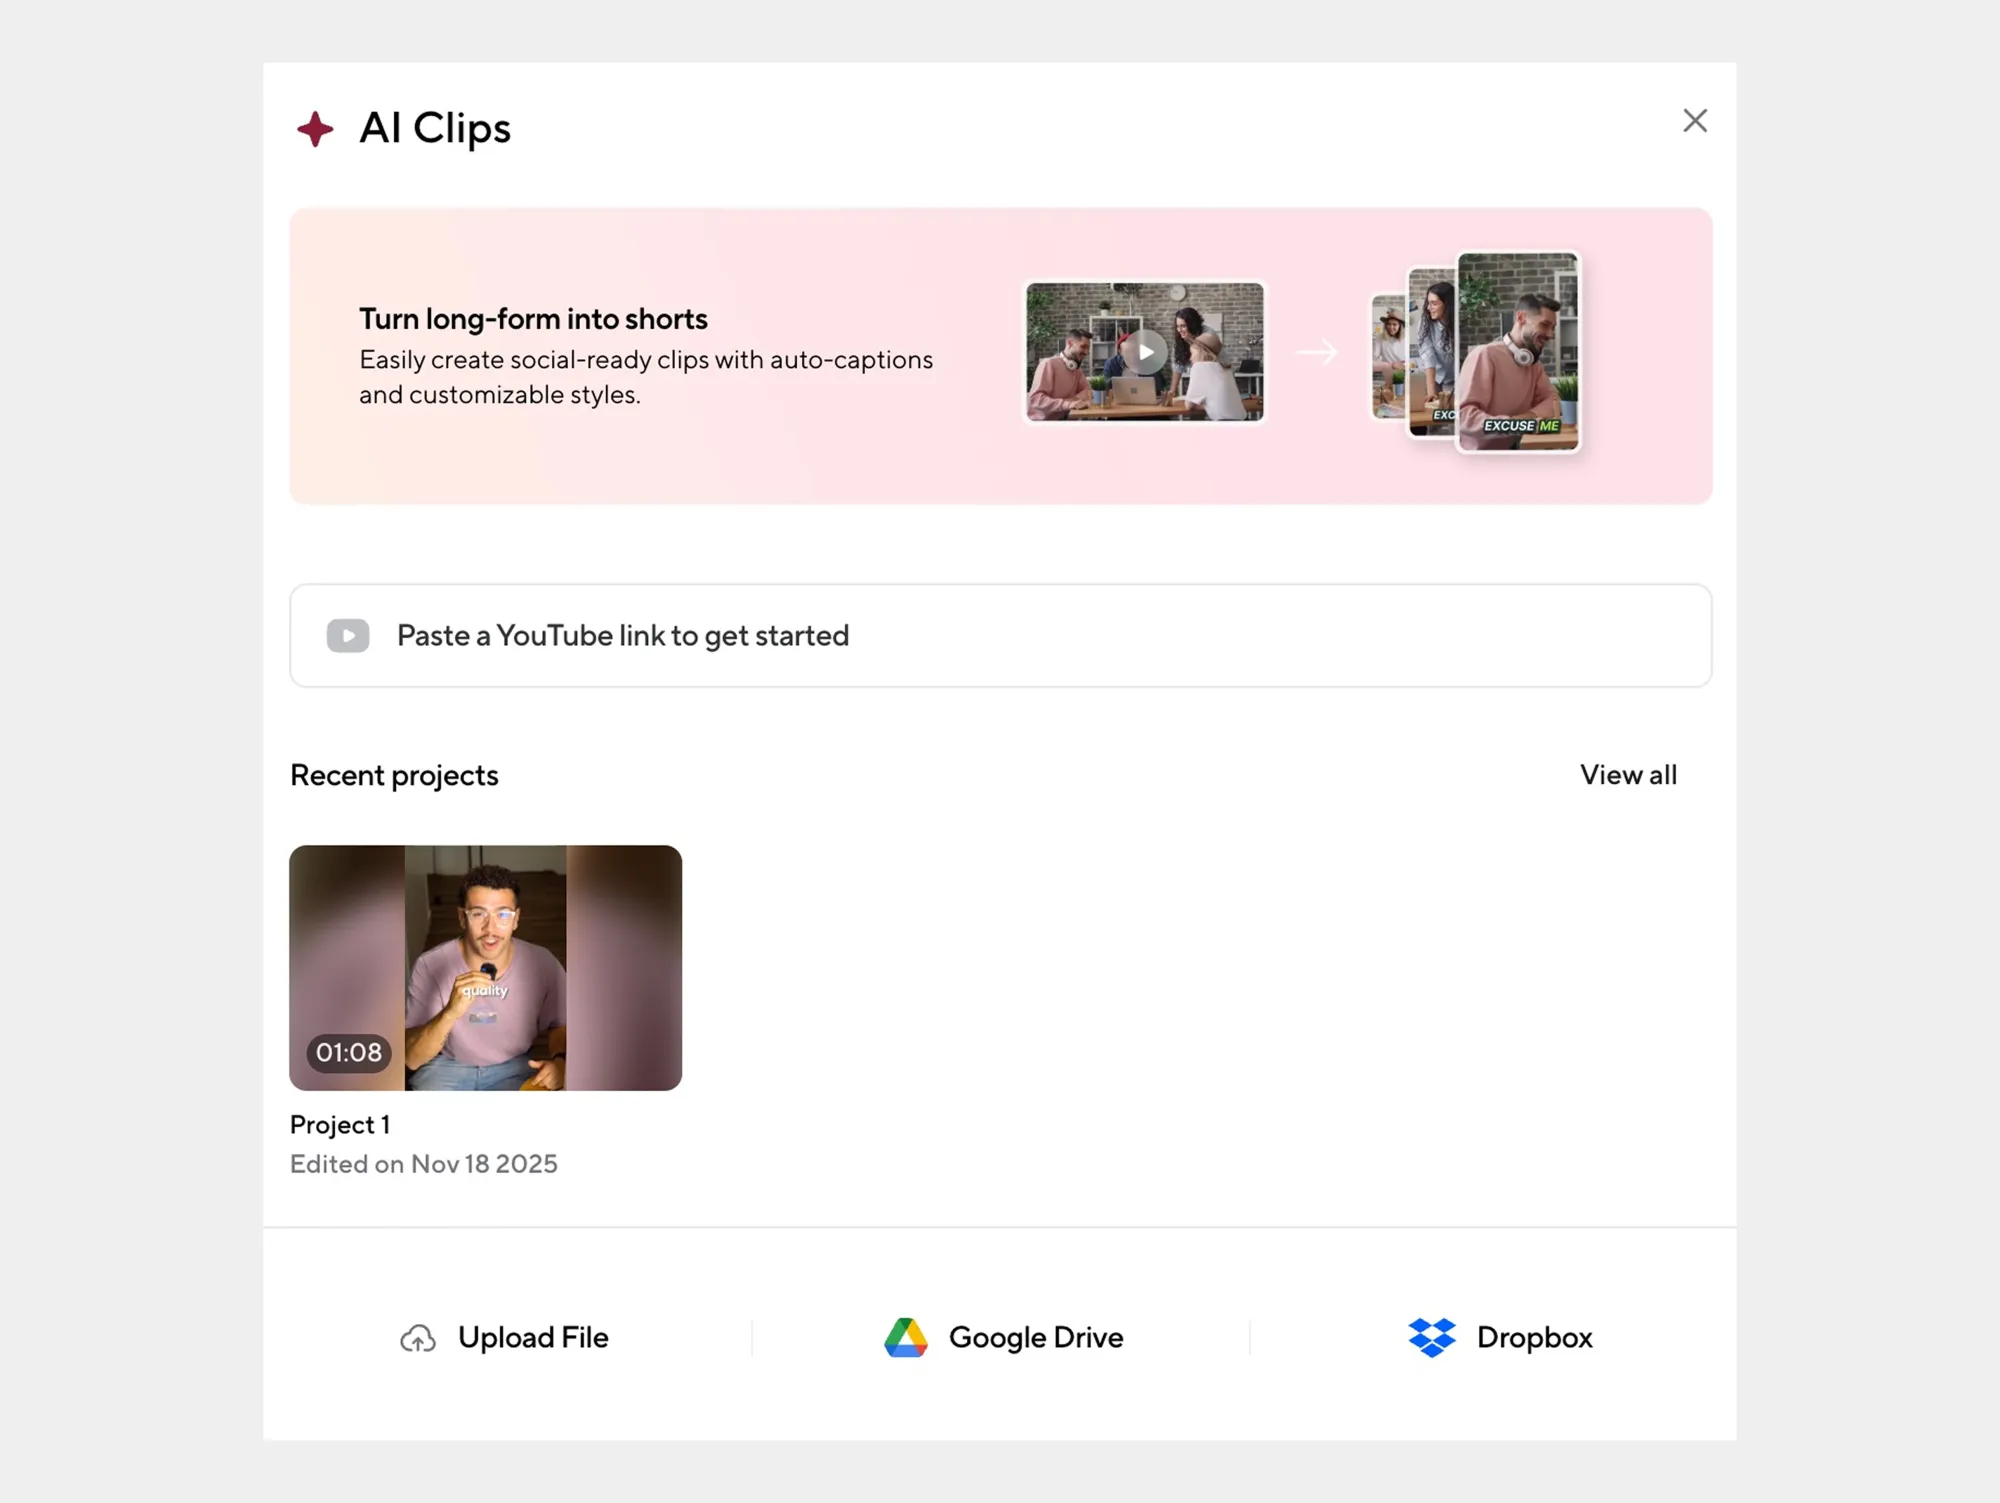
What stands out here is how fast the process feels. The upload is smooth, and once your video is in, the tool gets to work almost immediately. There’s no waiting around or guessing whether something worked, you’ll see your video ready for clipping in just a few moments.
This quick upload step is important because it sets the stage for everything that comes next. With your video successfully uploaded, the AI can begin analyzing the content, identifying potential highlights, and preparing your footage for clipping.
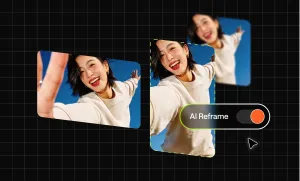
How to get clips from YouTube using our AI Clips tool
This is where clipping YouTube videos stops feeling like work and starts feeling… surprisingly easy. Once your video is uploaded, the AI clips tool steps in to do the heavy lifting for you.
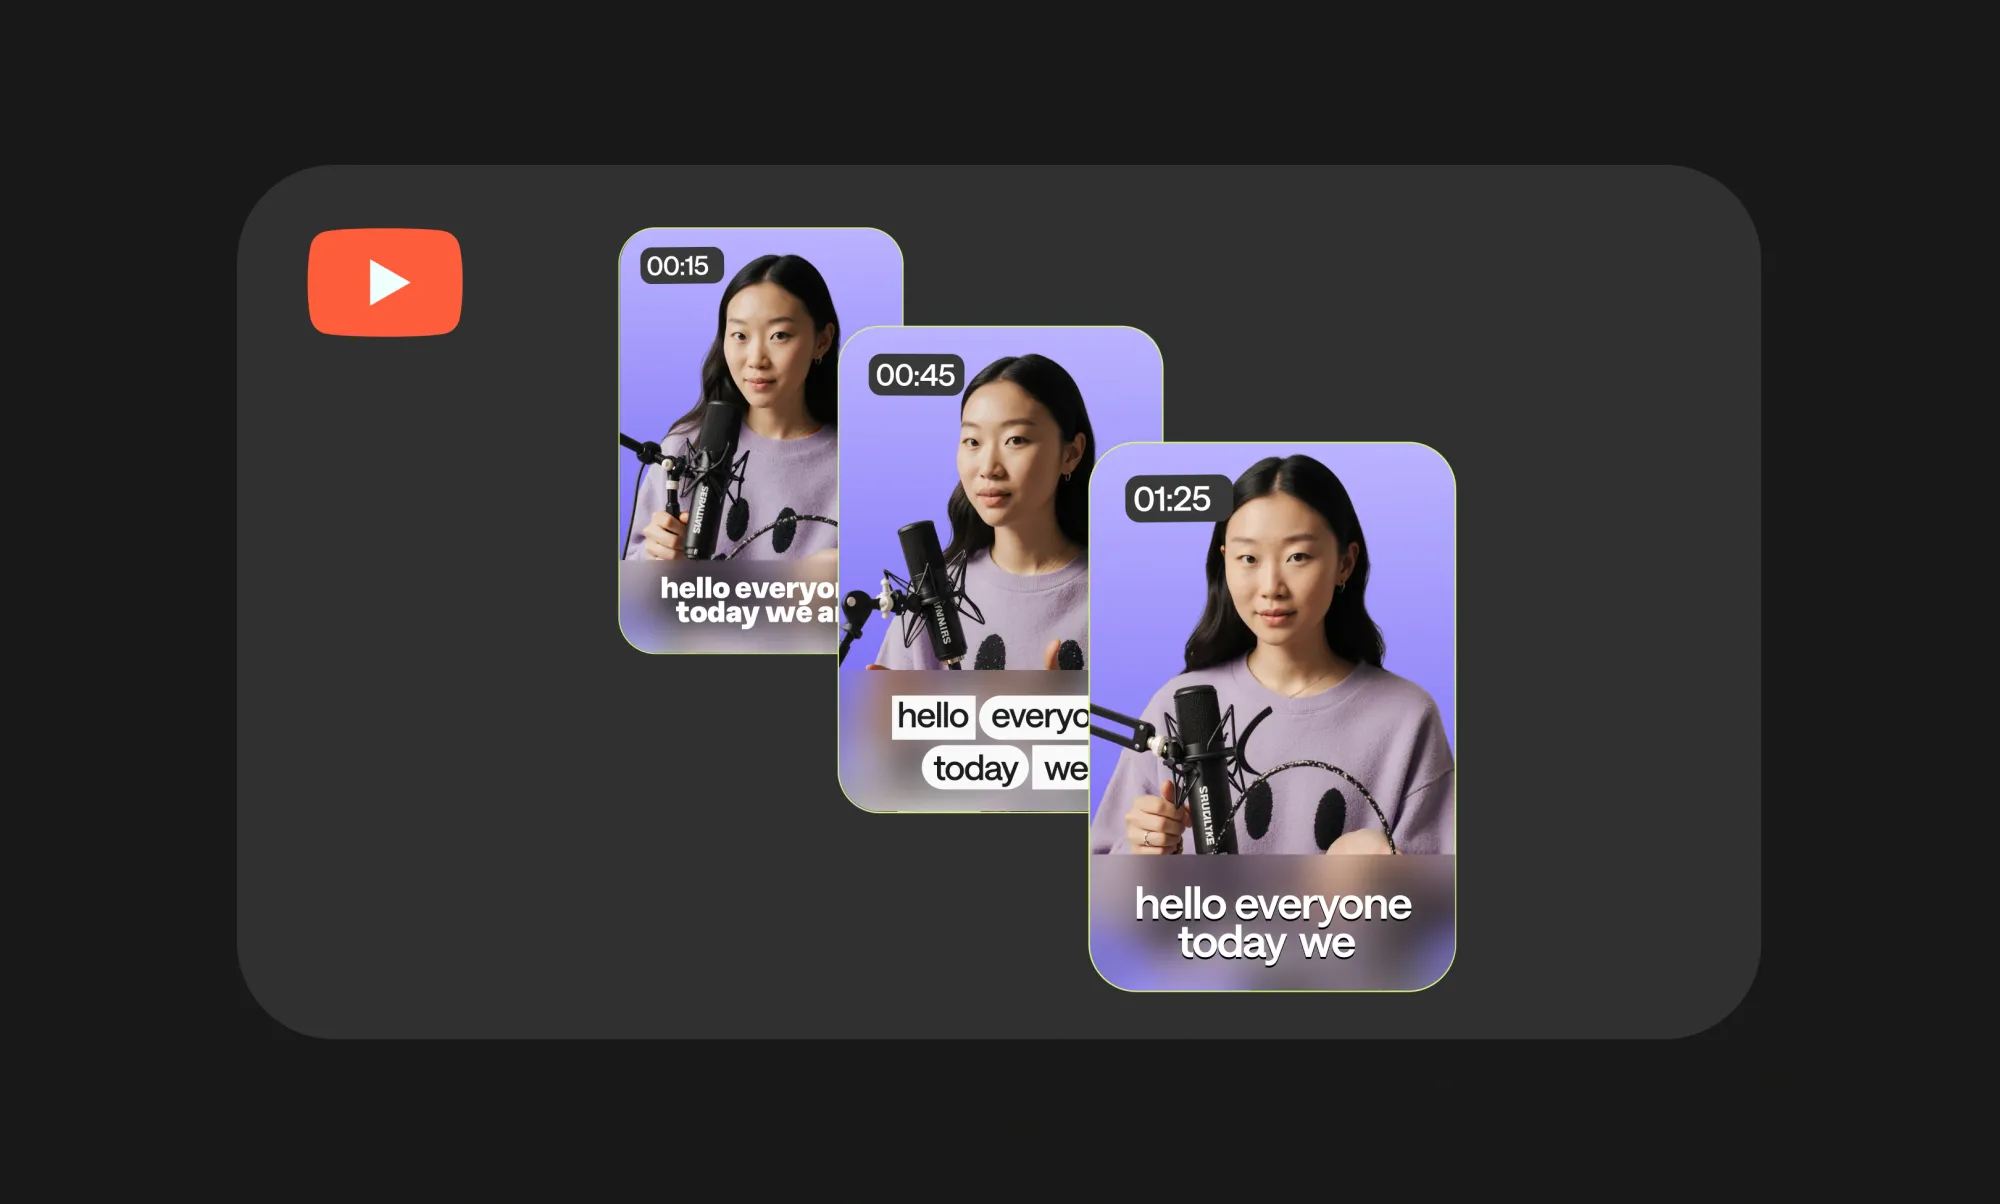
Instead of manually watching the entire video and guessing where the best moments are, the AI scans the content for you. It looks at things like pacing, audio cues, and visual changes to detect moments that are likely to work well as clips. Think highlights, strong reactions, or clean standalone segments you’d actually want to share.
From there, you’re in control. You can review the suggested clips, preview them instantly, and decide which ones are worth keeping. Want to adjust something? No problem. You can fine-tune the start and end points, trim a few extra seconds, or expand a clip if the moment needs more context.
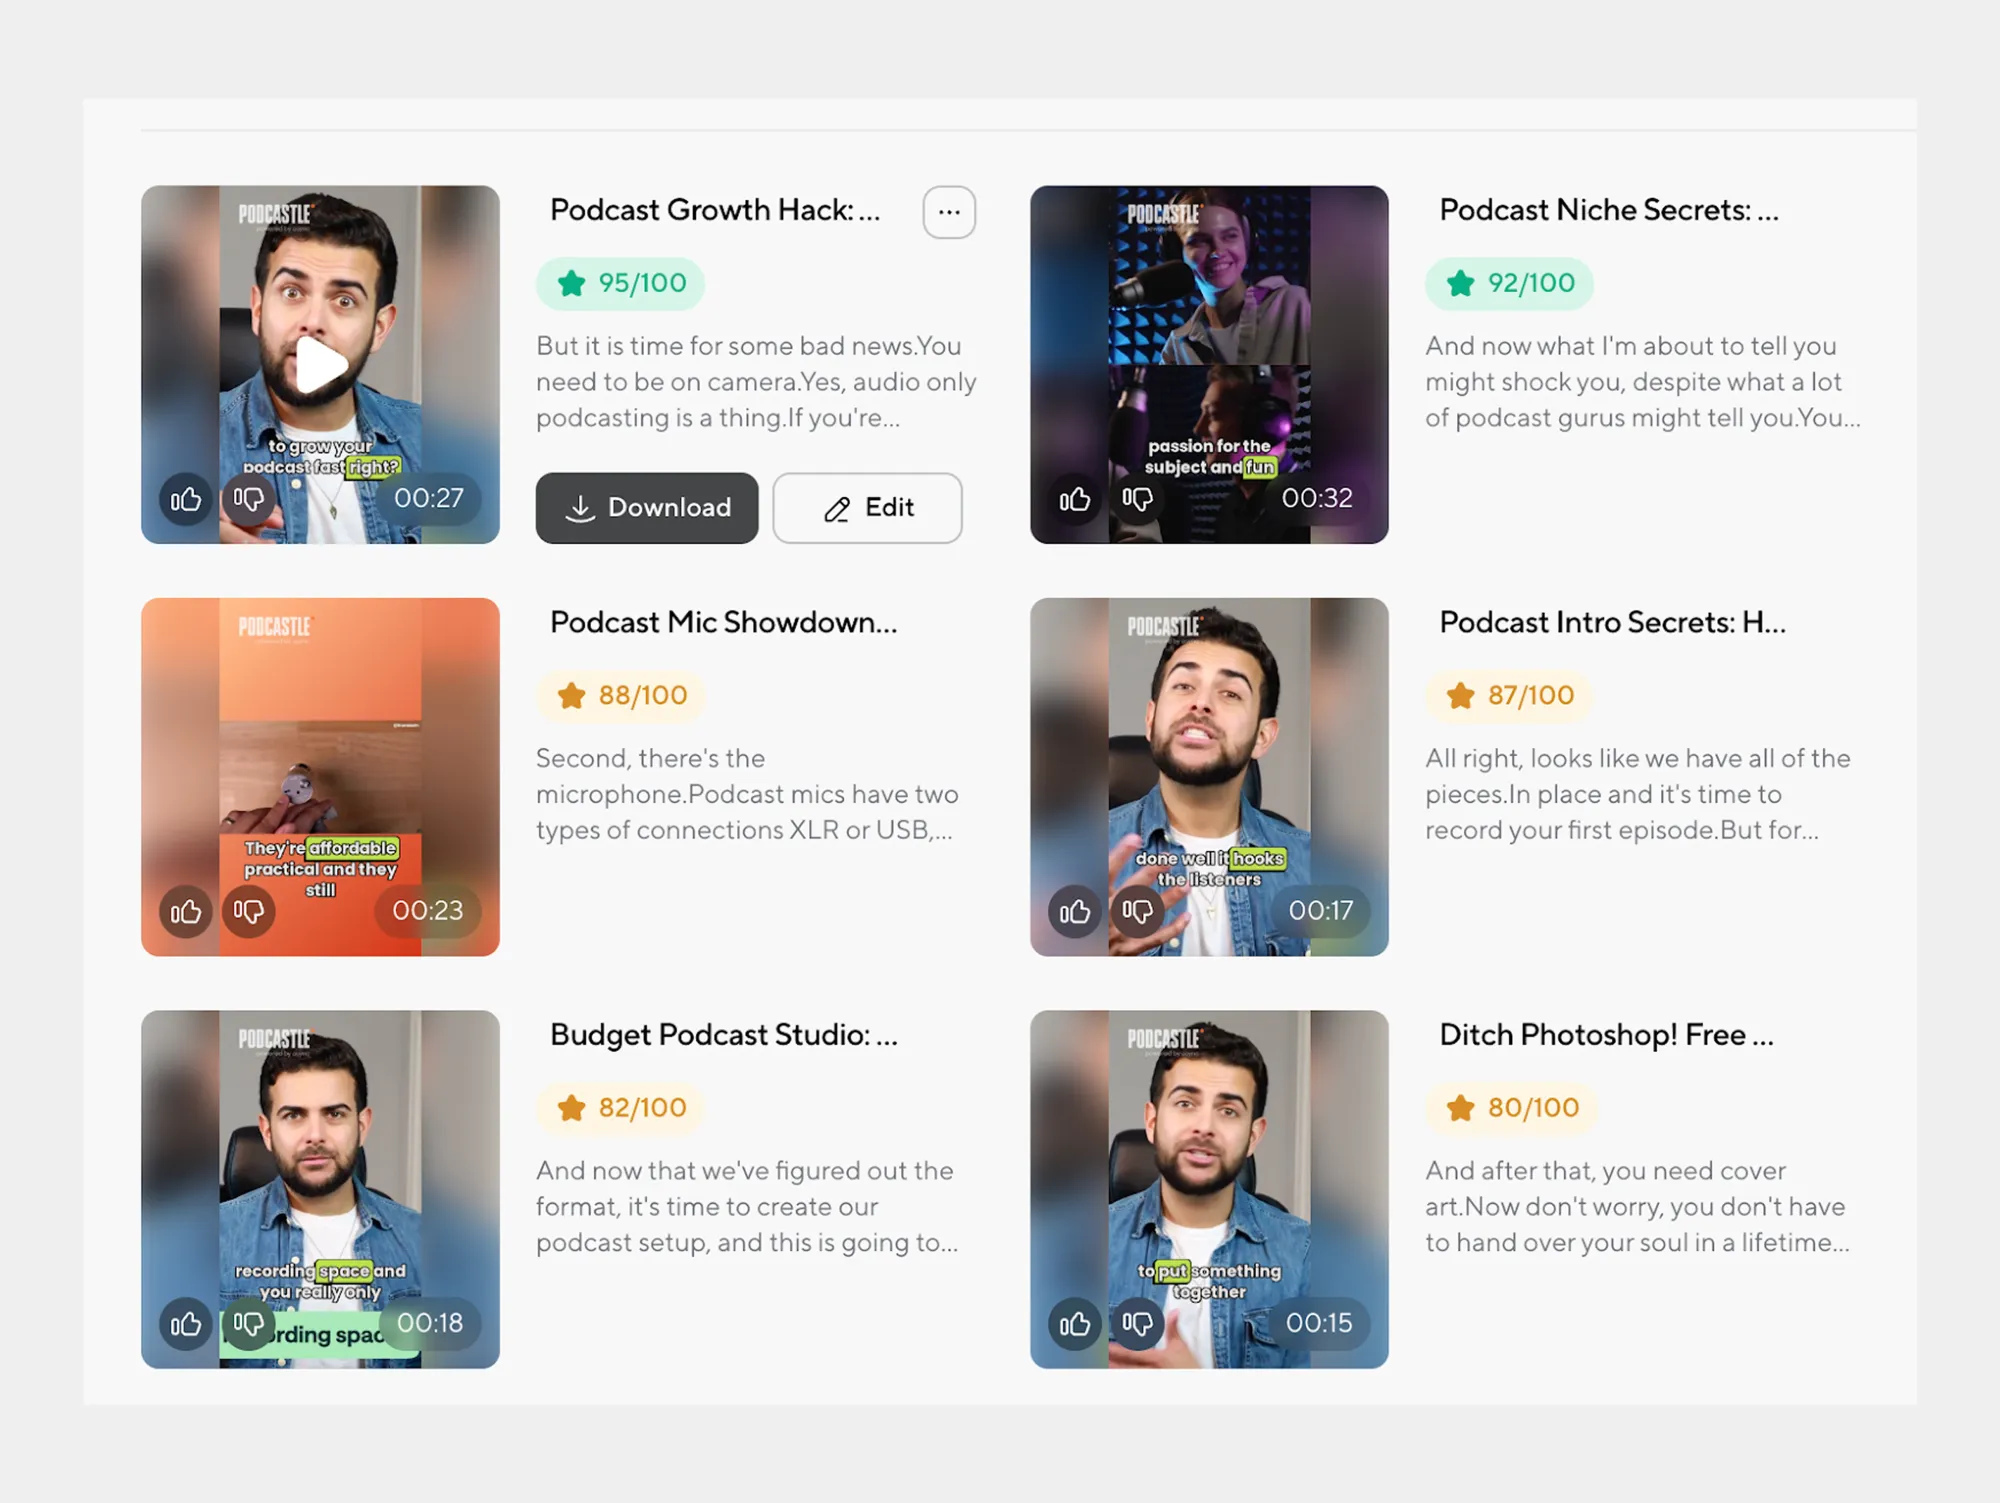
Once you’re happy with a clip, exporting it is just as straightforward. Select the clip, choose your preferred settings, and generate a clean, ready-to-use video file. No extra editing software, no complicated timelines, just a smooth process from full-length video to polished clip.
If you’ve ever wondered how to clip YouTube videos without spending hours editing, this step alone usually answers that question. And if you want even more control, the next section shows how to clip a specific part of a YouTube video with precision.
How to clip a part of a YouTube video with our tool
Sometimes you don’t need the full highlight the AI suggests, you already know exactly which moment you want. Maybe it’s a single sentence, a reaction, or a key explanation. This is where manual clipping gives you full control, without making the process feel technical or overwhelming.
Navigate the video timeline with ease
Once your video is open in the YouTube clip maker, you’ll see a clear, easy-to-use timeline. You can play, pause, and scrub through the video just like you would on YouTube, but with much more control. As you move through the timeline, it’s easy to stop right where the moment starts.
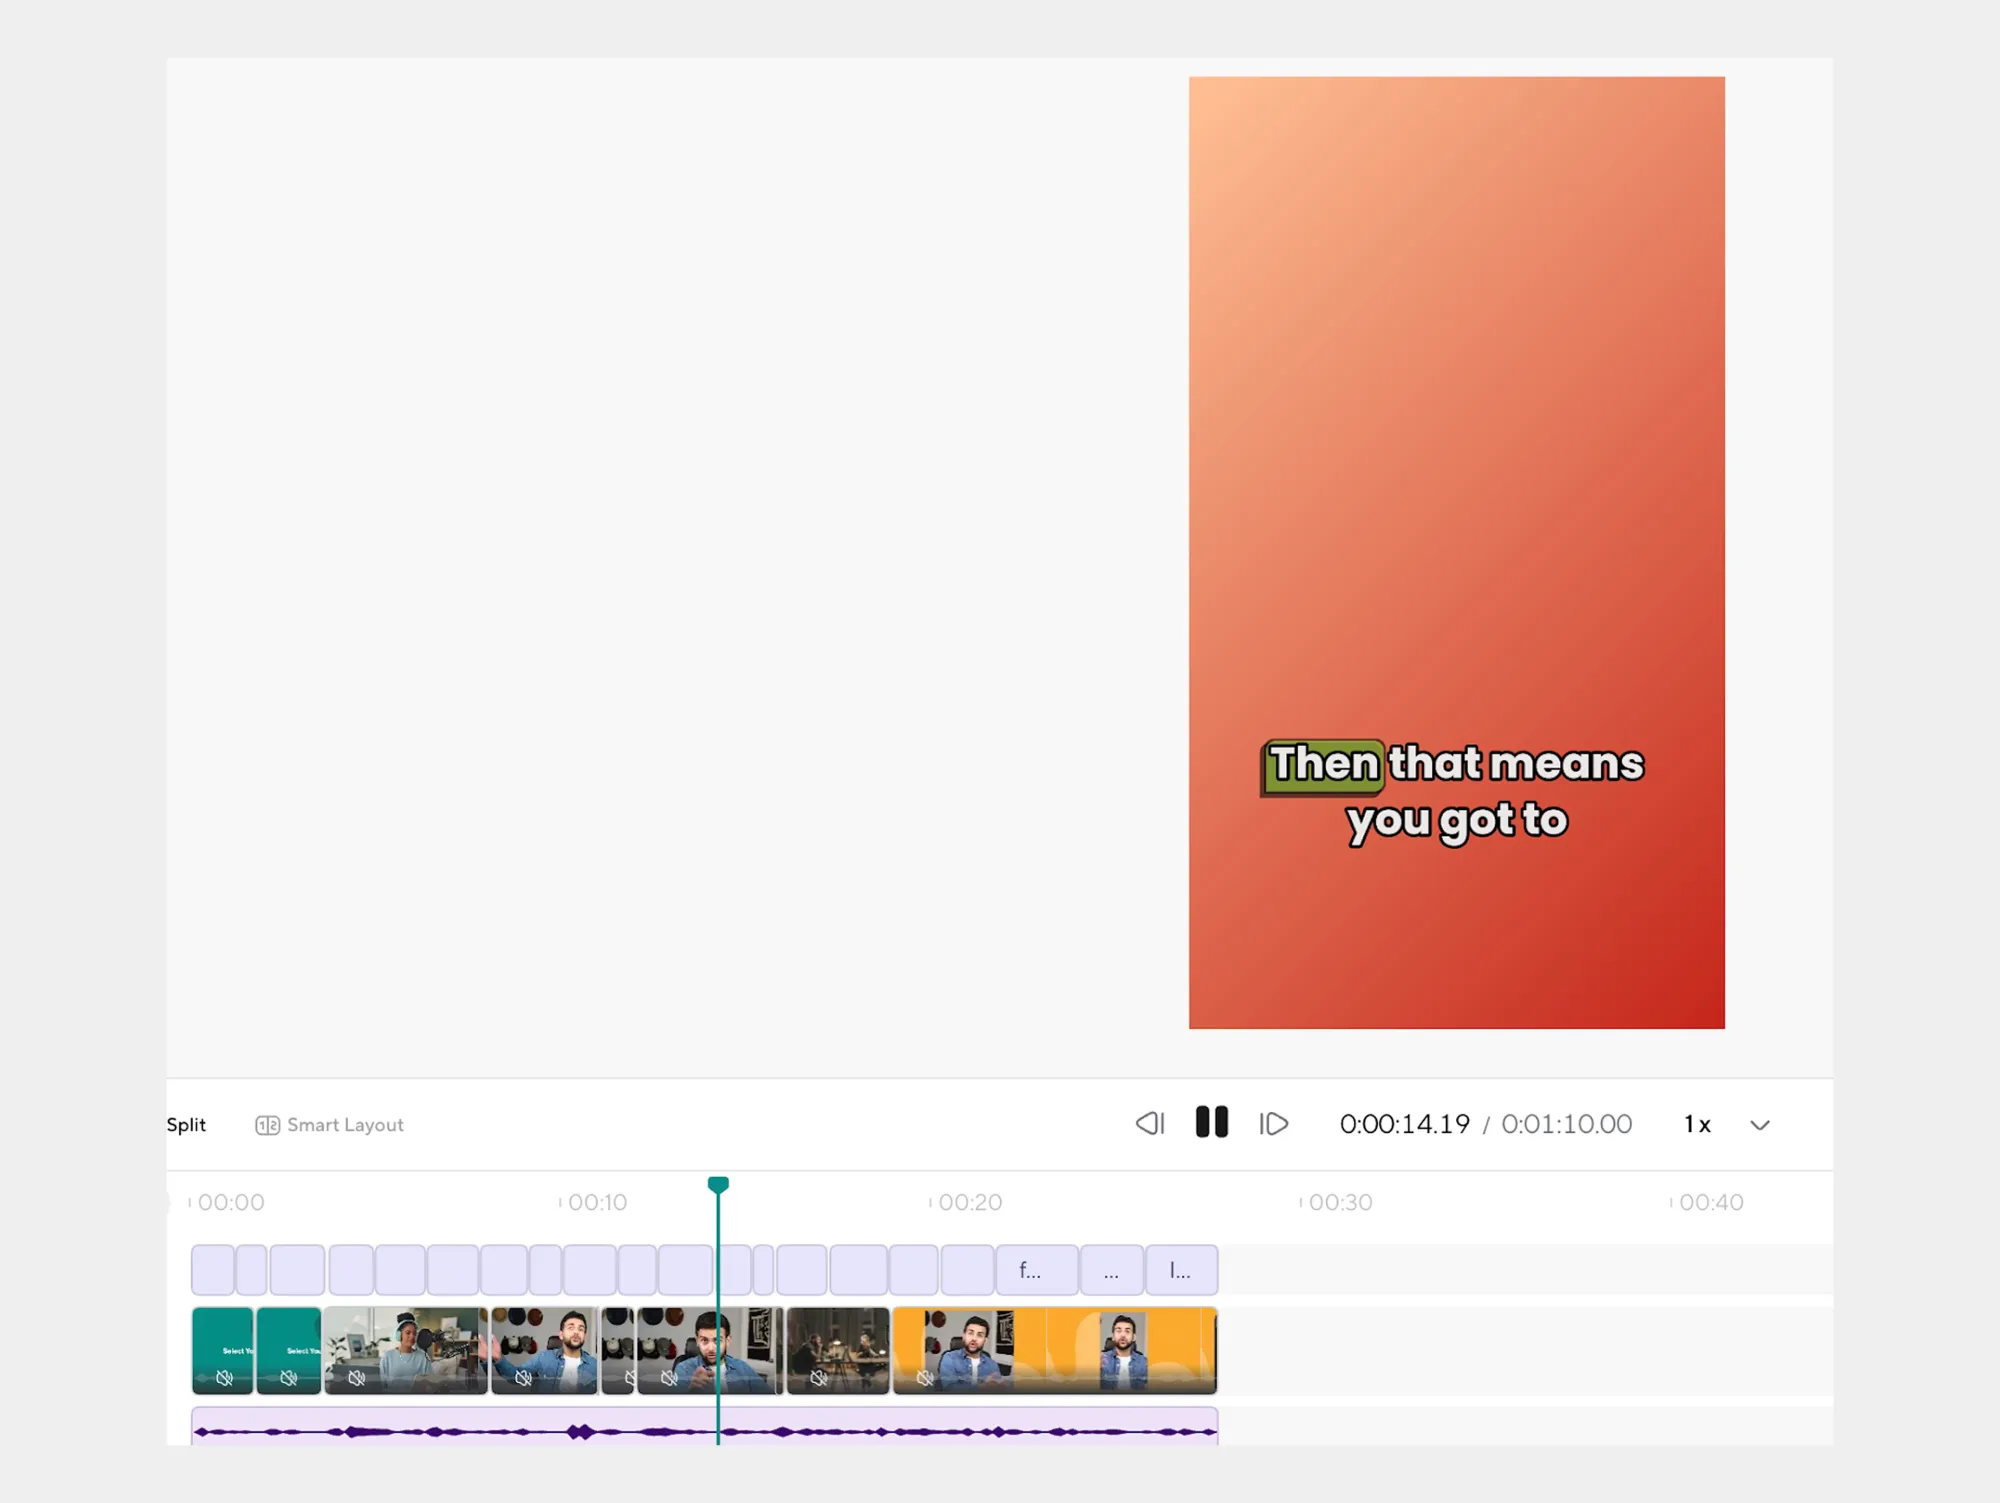
When you find the beginning of the clip you want, simply set your start point. Then keep playing until you reach the end of that moment and set your endpoint. No guesswork, no pixel-perfect dragging required.
Adjust the clip length for the best result
After selecting your section, you can fine-tune it. Maybe the clip needs an extra second at the start for context, or a tighter ending to keep it punchy. Adjusting the clip length is quick and precise, so you can shape the clip exactly the way you want it.
This is especially helpful if you’re creating content for different platforms. A clip for social media might need to be shorter and more direct, while a clip for a presentation might benefit from a bit more breathing room.
Preview before you finalize
Before saving anything, you can preview the clip to make sure it flows naturally. This quick check helps you catch small things, like an awkward cutoff or missing context, before exporting.
By the time you’re done, you’ve got a clean, focused clip taken straight from a longer YouTube video, without the usual editing friction. Next, we’ll cover how to save your clips from YouTube, including formats and organization tips, so everything stays neat and ready to use.
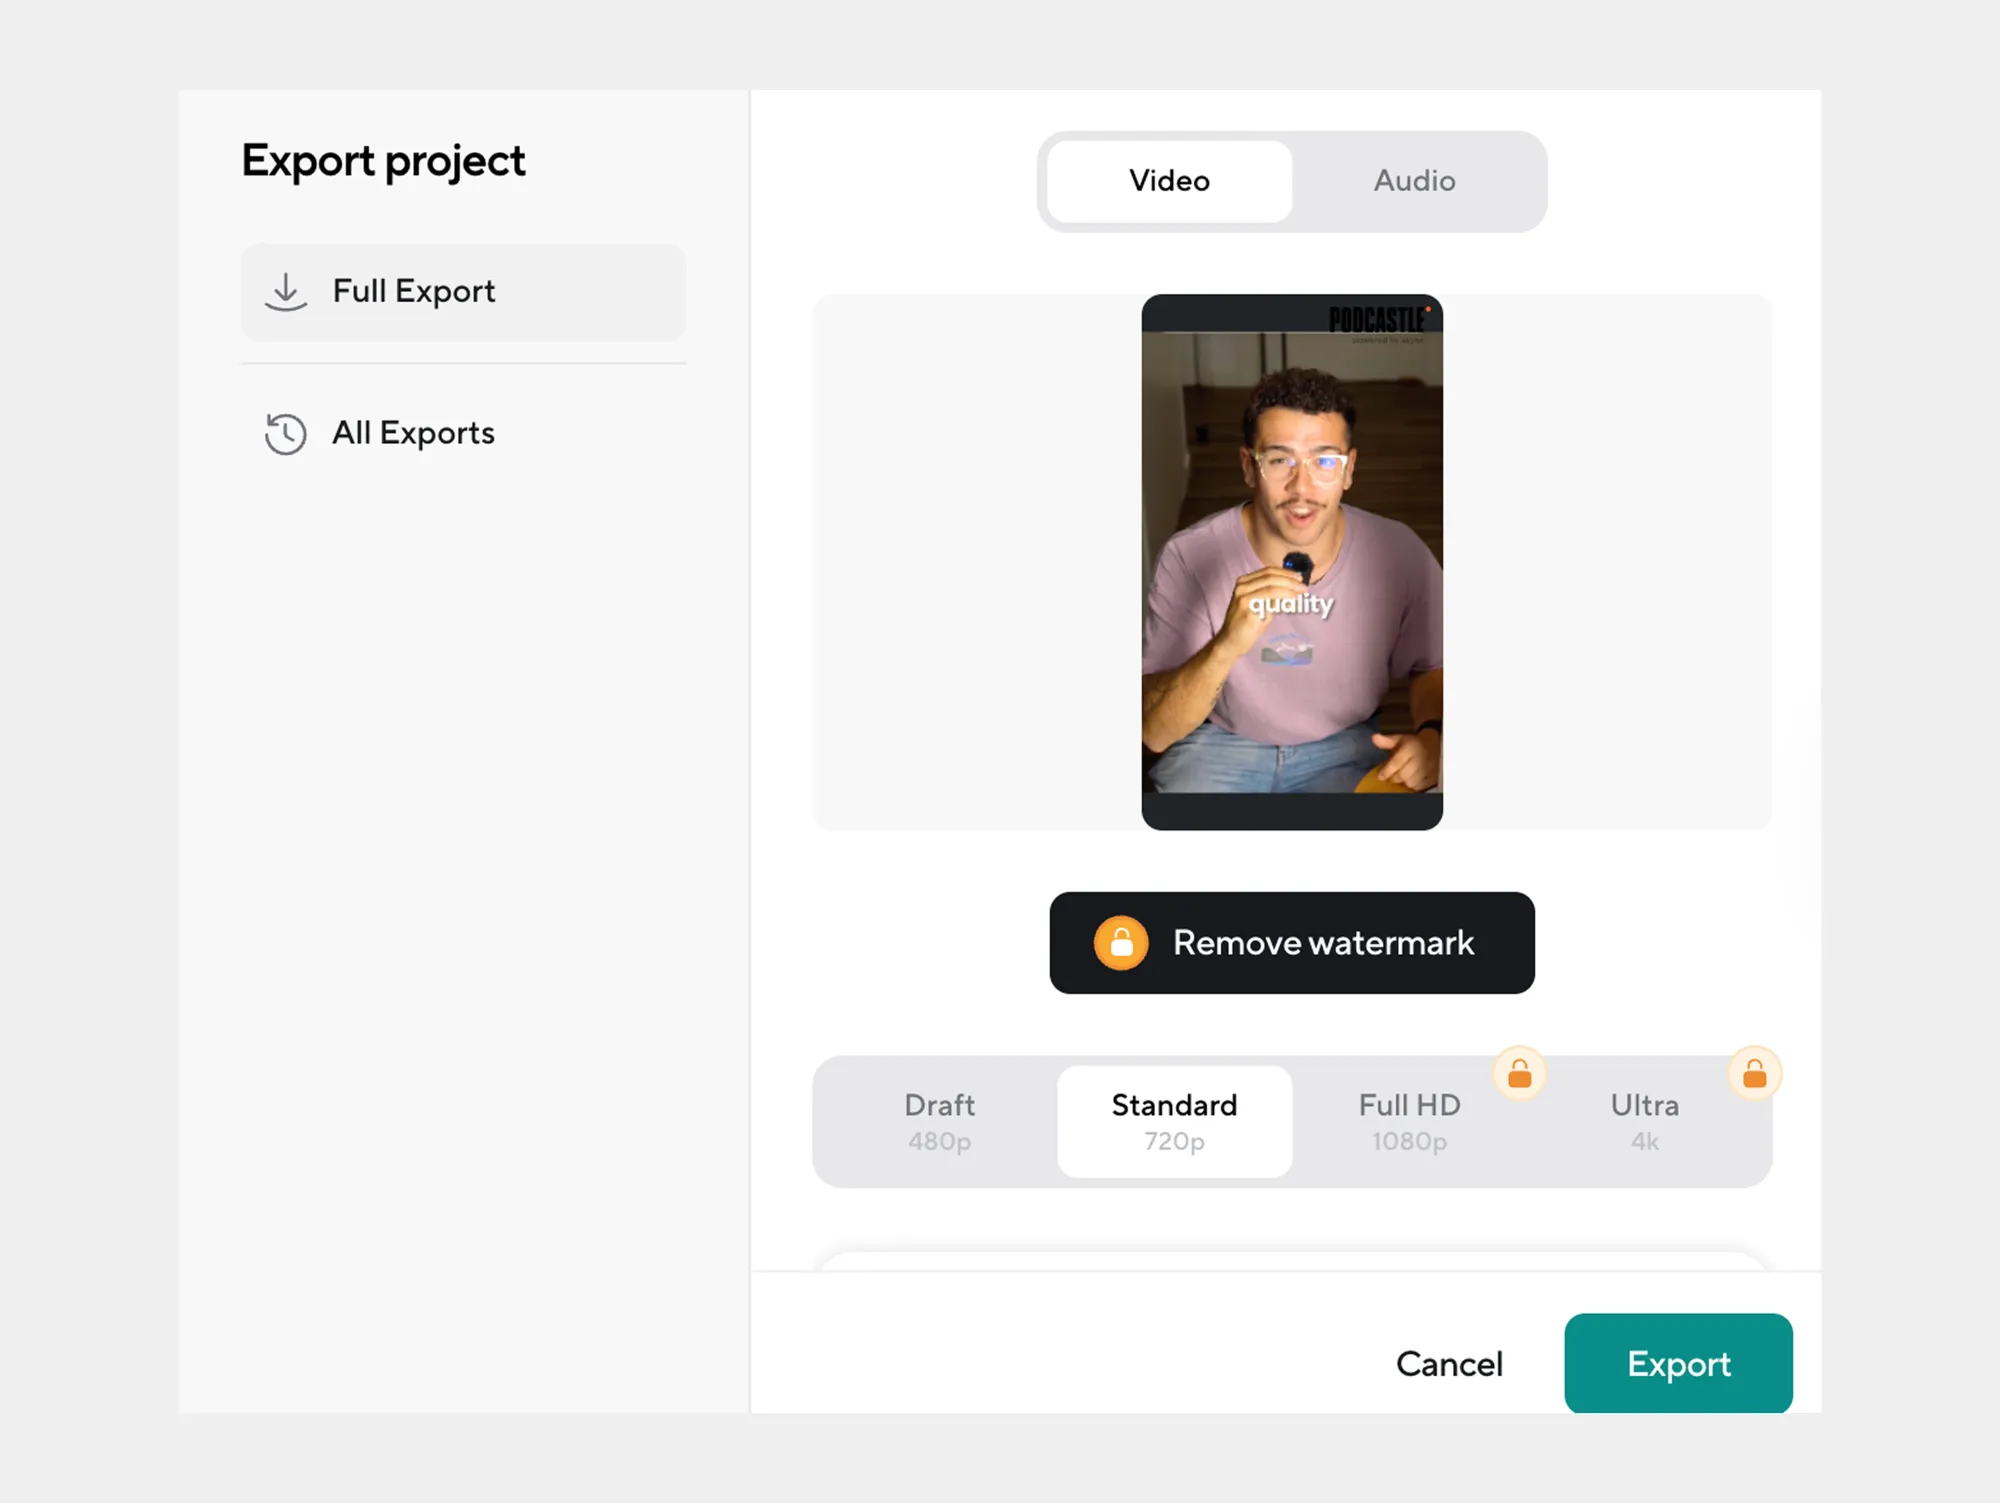
How to save clips from YouTube using our tool
Once your clip is ready, saving it should feel just as easy as creating it, and that’s exactly the point. After all, there’s no reason a simple export should slow you down.
Choose the right format for your needs
When you’re ready to save, the YouTube clip creator gives you a few standard file format options, like MP4 or MOV. These formats work well across platforms, whether you’re uploading clips to social media, adding them to a presentation, or storing them for later use.
If you’re not sure which format to pick, MP4 is usually a safe choice. It’s widely supported, lightweight, and easy to share. MOV files, on the other hand, can be useful if you’re planning additional edits in professional editing software.
Download and organize your clips
After selecting your format, download the clip directly to your device. From there, it’s a good idea to organize your clips right away, especially if you’re creating multiple clips from the same YouTube video.
You might group clips by:
• Project or campaign name
• Platform (short-form, long-form, presentations)
• Date or video source
This small habit can save you a lot of time later, especially when you need to find a specific clip quickly.
With your clips saved and neatly organized, you’re free to reuse, repurpose, or share them whenever you want. Up next, we’ll look at how to make and customize clips using the YouTube clip maker, so you can tailor each clip to fit your exact goal.
How to make and customize clips with the YouTube clip maker
Getting the clip is just the start. Once you have your basic cut, the YouTube clip maker gives you the flexibility to shape that clip so it actually fits your goal, whether that’s grabbing attention on social media or keeping things clean and professional for a presentation.
Adjust clip length and pacing
Not every clip needs the same rhythm. Some moments work best when they’re short and snappy, while others need a few extra seconds to land properly. With the clip maker, you can quickly adjust the length of your clip, trimming unnecessary pauses or extending it slightly to add context.
This is especially useful if you’re repurposing the same video for different platforms. A tighter cut might work better for short-form content, while a slightly longer version can feel more natural elsewhere.
Add simple enhancements
Customization doesn’t have to mean heavy editing. Small tweaks, like refining where the clip starts or ends, can make a big difference in how polished the final result feels. These subtle adjustments help your clip feel intentional, not rushed or awkwardly cut.
Because everything happens in one place, you don’t have to jump between tools or re-upload files. You can test different versions of the same clip until it feels right.
Tailor clips to specific use cases
Think about where your clip will live before you finalize it. Is it meant for social media, internal sharing, or a longer piece of content? Customizing clips with that purpose in mind helps you get more value out of every YouTube video you work with.
Once you’re happy with how your clip looks and feels, it’s ready to move forward. In the next section, we’ll explore how to use AI to create clips from YouTube videos, and why AI makes this whole process faster and more efficient.
How to use AI to create clips from YouTube videos
If you’ve ever tried to find the right moment in a long YouTube video, you know how much time it can take. Watching, rewinding, scrubbing the timeline, second-guessing yourself, it adds up fast. This is exactly where AI changes the game.
Instead of starting from scratch, the AI clips tool analyzes your video for you. It looks at visual changes, speech patterns, and pacing to identify moments that are likely to work well as standalone clips. In other words, it helps surface the parts people actually want to watch.
Let AI do the first pass
Once your video is uploaded, the AI automatically scans it and suggests potential clips. These might be highlights, strong talking points, or moments that naturally feel complete on their own. You don’t have to accept every suggestion, but having a smart starting point saves a huge amount of time.
This is especially helpful if you’re working with longer videos, like interviews, podcasts, or tutorials, where finding good clip-worthy moments manually can feel overwhelming.
Refine clips your way
AI doesn’t replace your creative control, it supports it. After the tool suggests clips, you can step in and refine them. Adjust the timing, trim the edges, or expand a clip if you want more context. The AI handles the heavy lifting, and you make the final call.
This balance is what makes AI-powered clipping feel practical, not limiting.
Work faster without sacrificing quality
By letting AI handle the analysis, you can focus more on how you want to use the clips rather than where to find them. That means faster workflows, fewer missed moments, and more consistent results, especially if you’re creating content regularly.
Next, we’ll get even more specific and walk through how to cut a precise clip from a YouTube video, so you can fine-tune every second when it really matters.
How to cut a clip from a YouTube video
Sometimes, you don’t want an auto-suggested highlight, you want that exact moment. A single sentence, a reaction, or a perfectly timed visual. Cutting a precise clip is where small adjustments make a big difference, and the good news is, it doesn’t have to be complicated.
Select the exact moment you want
Start by playing your video and pausing right where the clip should begin. Set your start point, then continue watching until you reach the natural end of that moment, and set the endpoint. This gives you a clean cut that feels intentional rather than rushed.
If you’re wondering how to cut a clip from a YouTube video without advanced editing skills, this step alone usually answers that question.
Fine-tune the start and end points
Once your clip is selected, take a moment to refine it. Shifting the start or end by even a second can improve flow, add clarity, or remove unnecessary pauses. These small tweaks help the clip feel polished and professional.
This level of control is especially useful if the clip will be shared on social media, where timing and pacing really matter.
Preview and lock it in
Before saving, preview the clip from start to finish. This quick check helps you catch things like abrupt cutoffs or missing context. When it feels right, you’re ready to move forward with confidence.
By the end of this step, you’ll have a precise, high-quality clip pulled directly from a longer YouTube video, no over-editing, no frustration.
Start clipping your YouTube videos with ease
Clipping YouTube videos doesn’t have to be complicated or time-consuming. Once you know the steps, downloading a video responsibly, uploading it into the AI clips tool, selecting the right moments, and saving your clips in the format you need, the whole process becomes smooth and surprisingly efficient.
Whether you’re creating content for social media, presentations, or repurposing long-form videos into shorter highlights, using an AI-powered approach helps you work faster without sacrificing quality. Instead of spending hours searching for the perfect moment, you can focus on shaping clips that actually tell a story and hold attention.
If you’re ready to simplify your workflow and turn YouTube videos into clean, shareable clips, it’s time to give it a try.
Start creating clips now with our AI tool and see how easy clipping can be.
FAQs
How do I download a YouTube video to use with your tool?
To download a YouTube video, start by making sure you’re following YouTube’s terms of service and copyright rules. If the video is your own content, or you have permission from the creator, you can use YouTube’s official options or trusted third-party download tools to save the video as a file on your device. Once downloaded in a standard format like MP4, you can upload it directly into the AI clips tool and start clipping.
Can I use the clips I create for commercial purposes?
That depends on the rights you have to the original video. If you own the content or have explicit permission from the copyright holder, you can usually use the clips commercially. However, clipping videos you don’t own and using them for monetized or promotional purposes may violate copyright laws. Always make sure you’re respecting intellectual property rules and, when in doubt, get permission before using YouTube clips for commercial projects.
What file formats can I save my YouTube clips in?
Most AI clip tools allow you to save clips in widely supported formats like MP4 and MOV. MP4 is a popular choice because it works well across social media platforms, websites, and devices, while MOV is often preferred for further editing in professional software. Choosing the right format depends on how you plan to use the clip, but both options make it easy to store, share, and reuse your YouTube clips.
How do I extract a clip from a YouTube video?
To extract a clip, upload your downloaded YouTube video into the AI clips tool and either choose an AI-suggested highlight or manually select the section you want. Set your start and end points on the timeline, preview the clip to make sure it flows well, and then export it. This approach lets you pull clean, focused clips without needing advanced editing skills or complex software.
How do I cut clips from a YouTube video?
Cutting clips from a YouTube video involves selecting a precise portion of the video and trimming everything else away. With an AI-powered YouTube clip maker, you can scrub through the timeline, mark where the clip should begin and end, and fine-tune the timing if needed. Once you’re happy with the cut, you can save the clip as a standalone video, ready to share or reuse.
How to capture YouTube video clips?
Capturing YouTube video clips starts with downloading the video file using approved methods, then uploading it into a clip-making tool. From there, you can capture specific moments by selecting sections of the timeline and trimming them into individual clips. This method gives you much more flexibility and quality than screen recording, especially if you want clean visuals and precise timing.
How do I take a section out of a YouTube video?
To take a section out of a YouTube video, upload the video into the AI clips tool and navigate to the exact moment you want. Set the start and end points around that section, preview the clip, and make any small adjustments needed for clarity or pacing. Once saved, that section becomes its own video clip, separate from the original longer video.