You’ve already done the hard part: writing the script. But turning that script into a finished video? That’s usually where things slow down. Recording voiceovers, syncing visuals, fixing pacing, adding captions, and cleaning audio, suddenly, a “simple” video turns into hours of work.
That’s exactly why script to video AI tools have exploded in popularity. They promise faster production, fewer tools, and less manual editing. But here’s the catch: most people jump straight into visuals and end up with videos that look okay, but feel rushed, robotic, or messy.
In this guide, we’ll take a smarter, more reliable approach: audio first, visuals second, polish last.
You’ll learn how to turn a script into a video with AI using a complete workflow, starting with a clean, natural voiceover in Async, then generating visuals with the best script to video tools, and finally polishing everything with captions, enhancements, and export-ready settings.
Whether you’re creating YouTube videos, Shorts, TikToks, faceless content, or turning podcast scripts into video, this process helps you finish with a publish-ready video, not just AI-generated clips.
Let’s get into it.
Quick answer: How to turn a script into a video with AI
Turning a script into a video with AI works best when you follow a simple, audio-first workflow. Start by generating a natural voiceover from your script using Async, where you can control pacing, tone, and pronunciation. Next, create visuals with a script to video AI tool like CapCut, Canva, Pictory, or Lumen5 by syncing your voiceover to scenes or templates. Finally, polish the video by adding subtitles, enhancing audio and visuals, and exporting in the right format for your platform.
What you need before you start
Before you turn a script into a video with AI, it helps to make a few quick decisions. You don’t need a full production plan, but a little clarity upfront will save you a lot of editing later.
• First, know what kind of script you’re working with: Short-form scripts for Shorts, Reels, or TikTok usually rely on fast pacing, punchy lines, and strong hooks in the first few seconds. Long-form scripts for YouTube, explainers, or narration-heavy videos need more breathing room, natural transitions, and clearer structure between sections.
• Next, decide where the video will live: Vertical platforms favor quick cuts, bold captions, and tight timing, while horizontal YouTube videos allow for slower pacing, longer scenes, and more detailed visuals. This choice affects everything from caption size to scene length.
• Think about your visual approach early: Some creators prefer template-based editors with stock footage and text animations, while others use AI-generated scenes or a mix of both. There’s no right answer, what matters is consistency and clarity.
• Have basic brand elements ready if you’re publishing publicly: Fonts, colors, and logos aren’t mandatory, but even minimal branding helps your videos feel intentional and recognizable.
Mini tip: If your script isn’t time-coded, don’t worry. You’ll control pacing later by adjusting pauses, sentence breaks, and section timing once the voiceover is generated.
Step 1: Turn your script into audio with Async
If you want your script to video AI workflow to feel smooth instead of chaotic, start with audio. A clean, natural voiceover gives you structure, pacing, and clarity before you ever touch visuals. Once the audio is right, everything else becomes easier to sync, trim, and polish.
Paste your script into Async
Begin by pasting your finished script directly into Async’s text-to-speech workflow. This works whether you’re dealing with a short 30-second hook for social video or a longer narration for YouTube or faceless content.
Don’t worry about making the script “perfect” yet. You’ll refine pacing and emphasis inside the editor once you hear it out loud.
Choose the right voice style
Voice choice matters more than people think. The wrong tone can make even a great script feel flat.
When selecting a voice, pay attention to:
• Tone: conversational, energetic, calm, authoritative
• Pace: faster for Shorts and Reels, steadier for long-form
• Energy level: subtle confidence usually performs better than overhyped delivery
If you’re building a series or a channel, consistency is key. Using the same voice across videos helps create a recognizable “sound” for your content.

Fix pronunciation before it becomes a problem
Scripts often include brand names, acronyms, product terms, or names that AI voices don’t always pronounce correctly on the first try. Async lets you adjust pronunciation so your narration sounds intentional instead of automated.
This step is especially important for:
• Brand or product names
• Technical terms
• Abbreviations
• Non-English names
A few seconds spent fixing pronunciation here saves you from re-recording or awkward edits later.
Control pacing with pauses and structure
This is where audio-first really pays off. Instead of forcing visuals to match a rushed narration, you shape the narration itself.
Use pauses to:
• Separate ideas
• Emphasize key lines
• Create breathing room for visuals or captions
For short-form content, tighter pauses keep energy high. For longer videos, natural breaks help the narration feel human and easier to follow.
Short-form pacing tip
Hook your audience in the first 1–2 seconds. Use quicker sentence delivery, intentional micro-pauses, and strong emphasis on the opening line. Every pause should feel deliberate, not accidental.
Long-form narration tip
Let the script breathe. Add subtle pauses between paragraphs, emphasize transition phrases, and allow space for examples or explanations. Natural rhythm matters more than speed here.
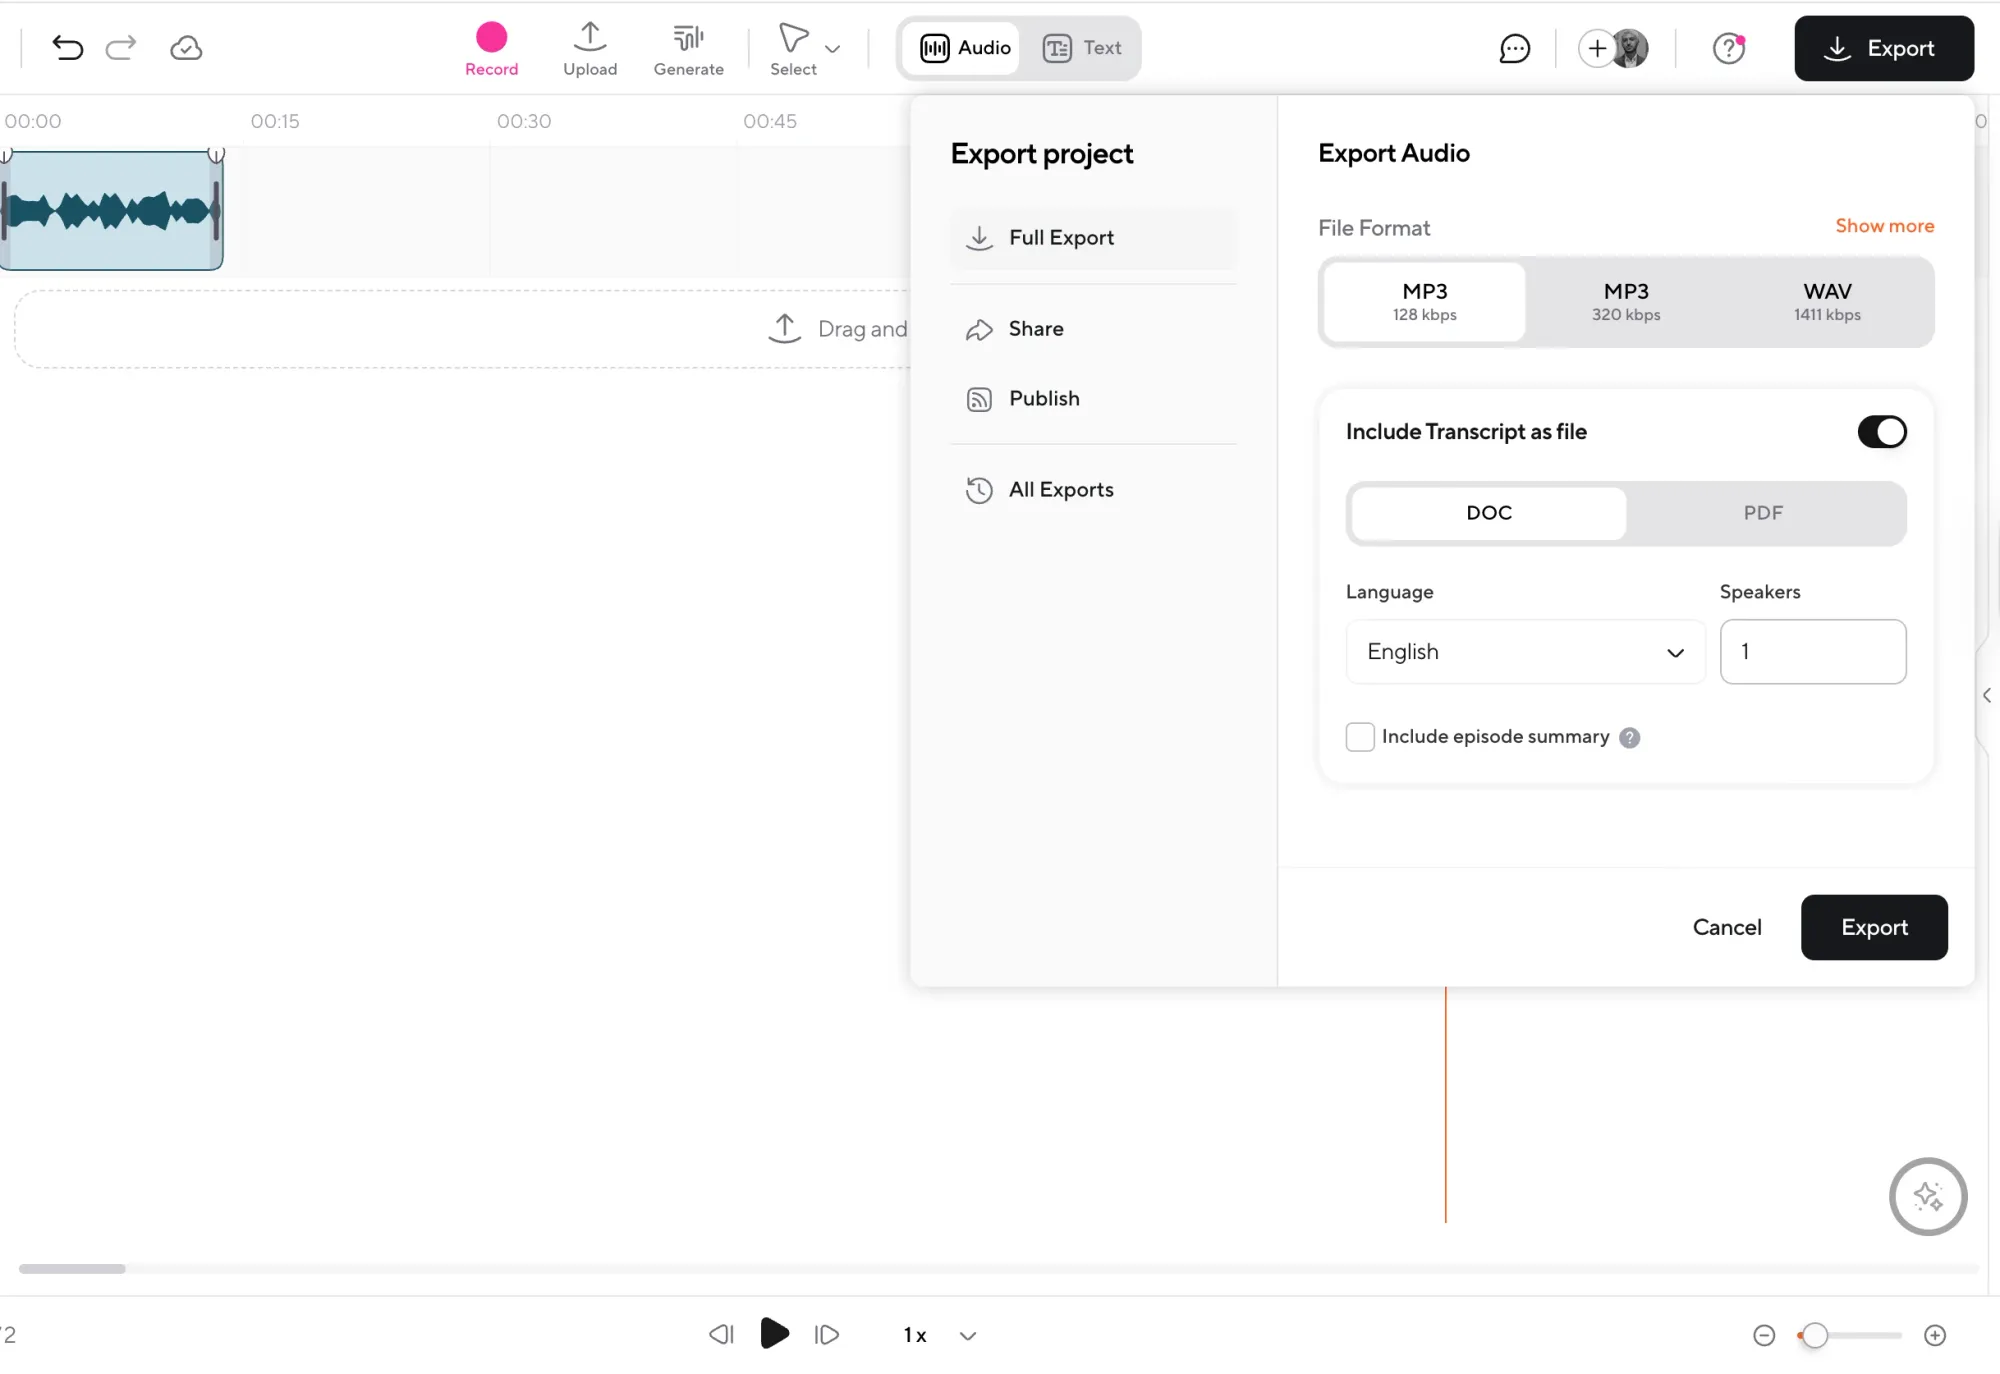
Generate and export the audio
Once you’re happy with the voice, pacing, and pronunciation, generate the audio and export it. This file becomes the backbone of your entire video.
At this point, you have something powerful:
• A finished voiceover
• Clear timing for every line
• Built-in structure for visuals and captions
Why audio-first works so well
Most people trying to figure out how to turn a script into a video with AI start by chasing visuals. That’s how videos end up feeling disjointed or rushed. Starting with audio flips the process in your favor.
When the voiceover is locked:
• Visual tools can sync automatically
• Captions are more accurate
• Scene timing feels intentional
• Editing becomes faster instead of reactive
Think of the voiceover as the spine of the video. Once it’s solid, everything else has something reliable to attach to.
Step 2: Script to video AI: turn your script into a video using these tools
Once your voiceover is ready, it’s time to turn your script into an actual video. This is where script to video AI tools come in. Instead of editing from scratch, these tools help you map narration to scenes, visuals, and captions much faster.
Before choosing a tool, it helps to understand how most script to video platforms work.
Two types of script for video AI tools
Most tools fall into one of these categories:
1. Template-based editors: These focus on speed and consistency. You bring your audio, apply templates, auto-generate captions, and export quickly. They’re ideal for Shorts, Reels, TikTok, and repeatable content formats.
2. Script-to-scenes tools: These analyze your script and automatically suggest scenes using stock footage, images, or layouts. They’re useful for faceless channels, narration videos, and turning written content into visuals with minimal manual work.
No matter which tool you choose, AI works best when you give it structure. A simple method is to break your script into 6-12 visual beats, with one clear idea per scene. This keeps visuals aligned with your narration instead of fighting it.
CapCut script to video
CapCut is one of the fastest ways to turn a script into a social-ready video. It shines when you need speed, trendy templates, and strong captioning for vertical platforms.
How to use CapCut in this workflow
Import your Async voiceover, let CapCut auto-generate captions, choose a template or style, and fine-tune timing and text emphasis before exporting.
Best for: Shorts, Reels, TikTok, fast-paced social videos, creator-first edits.
Canva script to video
Canva works well when brand consistency matters. It’s less about flashy edits and more about clean, structured visuals that feel intentional.
How to use Canva in this workflow:
Create slides or scenes based on your script beats, drop in your Async voiceover, sync animations to narration, and export in the right format for your platform.
Best for: Explainer videos, product walkthroughs, educational content, and branded social videos.
Pictory script to video
Pictory is built specifically for turning scripts into stock-based videos. It automatically maps lines of your script to visual scenes, which makes it popular for faceless channels.
How to use Pictory in this workflow:
Paste your script, let the tool generate scenes, replace or refine stock clips, then sync your Async voiceover for more natural pacing.
Best for: Narration videos, listicles, faceless YouTube content, storytelling with stock visuals.
Lumen5 script to video
Lumen5 is designed for repurposing written content into short videos. It’s especially useful when you’re turning blog posts, scripts, or articles into social-friendly formats.
How to use Lumen5 in this workflow:
Feed your script into the editor, choose a visual style, adjust scenes, and sync your voiceover before exporting.
Best for: Content repurposing, social summaries, marketing videos from existing scripts.
How to choose the right script for the video tool
If you want speed and trends, go with CapCut.
If you need clean, branded visuals, Canva is a strong choice.
If you want automated stock storyboarding, Pictory or Lumen5 will save time.
The key is this: AI helps you move faster, but your voiceover sets the rhythm. When visuals follow the audio instead of the other way around, the final video feels intentional and easy to watch.
Step 3: Make it publish-ready in Async
Once your visuals are ready, the final step is polish. This is where Async shines, not as a visual generator, but as the place where everything gets tightened, cleaned, and prepared for publishing.
Think of this step as quality control. You’re not reinventing the video here; you’re making sure it sounds great, reads clearly, and feels intentional.
Import your visuals and voiceover
Start by importing the video clips or visual sequence you created in your script to video AI tool. Then add your Async-generated voiceover on top.
Because you locked your audio first, syncing is straightforward. Your narration already defines the rhythm, visuals just need to align with it.
Sync timing and tighten pacing
This is where small edits make a big difference.
Trim awkward gaps, tighten long pauses, and make sure visual transitions land cleanly on sentence breaks. For short-form videos, especially, even half a second of dead space can hurt retention.
A good rule of thumb:
• If a pause doesn’t add emphasis, shorten it
• If a sentence feels rushed, give it space
You’re aiming for confidence, not speed.
Add subtitles (style matters more than people think)
Subtitles aren’t optional anymore, but how they look matters just as much as accuracy.
When adding subtitles in Async, focus on:
• Readable sizing (especially on mobile)
• High contrast between text and background
• Safe margins so captions aren’t cut off
• Strategic emphasis on key words, not every word
Avoid cramming too much text on the screen at once. Captions should support the narration, not compete with it.
Caption style tip: Highlight important words, keep lines short, and avoid covering faces or key visuals.
Enhance the audio so it sounds “expensive”
Even the best AI voiceover benefits from light enhancement. Async’s audio tools help clean things up without overprocessing.
Use enhancement features to:
• Balance volume levels
• Improve clarity and presence
This step is especially important if your visuals came from multiple sources or if you’re publishing on platforms where audio quality affects perceived professionalism.
Apply light video enhancement (if needed)
If your visuals feel slightly dull or inconsistent, subtle video enhancement can help. This isn’t about heavy filters, it’s about making the video feel cohesive.
Small adjustments to sharpness, brightness, or consistency can elevate the final result without drawing attention to the edit itself.
Export with platform-ready settings
Before exporting, choose settings that match where the video will live:
• Vertical formats for Shorts, Reels, and TikTok
• Horizontal formats for YouTube
• Correct resolution and aspect ratio
• Optimized file size without sacrificing quality
This ensures your video uploads cleanly and looks good across devices.
Why this polish step matters
A lot of script to video workflows stop once visuals are generated. That’s why many AI videos feel rushed or unfinished.
Polishing inside Async ensures:
• Audio sounds clear and professional
• Captions are readable and intentional
• Timing feels tight instead of accidental
• The final export is ready to publish, not “almost there”
When audio, visuals, and captions work together, the video feels confident, and confidence is what keeps people watching.
Why Async works so well for script-first videos (and what else you can do inside Async)
When you start with a script, audio becomes the backbone of the entire video. That’s where Async fits naturally into a script to video AI workflow, not as a flashy visual generator, but as the place where your video finds its voice.
Script-first videos live or die by how the narration sounds. If the voiceover feels robotic, rushed, or inconsistent, no amount of visuals will save it. Async gives you control over the parts that matter most: tone, pacing, pronunciation, and consistency across videos. That’s especially important if you’re building a channel, a brand, or a repeatable content format.
Another advantage of using Async early is flexibility. Once your audio is locked, you’re free to experiment with visuals. You can test CapCut templates, try Canva layouts, or auto-generate scenes in tools like Pictory or Lumen5, all without touching the narration again. The audio stays clean and stable while visuals evolve around it.
Async also helps close the quality gap that many AI videos struggle with. Clean audio, balanced levels, and subtle voice enhancement make a video feel more polished, even if the visuals are simple. Add readable subtitles and tight timing, and suddenly the content feels intentional instead of automated.
Beyond voiceovers, Async supports a full finishing workflow. You can handle subtitles, basic editing, audio cleanup, and exports in one place, instead of bouncing between disconnected tools. That doesn’t just save time, it reduces mistakes and keeps your final video consistent.
At the end of the day, strong visuals grab attention, but clear, confident audio keeps people watching. When the sound is right, everything else gets easier.
Script writing tips that make AI videos actually watchable
AI can help you turn a script into a video fast, but it can’t fix a script that wasn’t written for video in the first place. The good news? You don’t need to be a screenwriter, just a little more intentional with how you write.
Write for the ear, not the page
Scripts that work well for AI voiceovers sound natural when spoken. That usually means:
• Shorter sentences
• Clear rhythm
• Fewer filler words
If a line feels awkward to say out loud, it will sound awkward in the video. Reading your script once at normal speaking speed is an easy quality check.
Start strong with a clear hook
Your hook decides whether people keep watching. Especially for Shorts, Reels, and TikTok, the first few seconds matter more than anything else.
Some simple hook formulas:
• “Most people do this wrong…”
• “If you’re struggling with ___, watch this.”
• “Here’s the fastest way to ___.”
• “I tested ___ so you don’t have to.”
The goal isn’t clickbait, it’s clarity. Tell viewers why the next 20-60 seconds are worth their time.
Build in pattern interrupts
Even the best scripts need variety. For short-form content, aim for a pattern interrupt every 5-10 seconds. This could be:
• A visual change
• A new on-screen text line
• A quick pause before a key point
These moments help reset attention and prevent drop-off.
Add visual cues directly into your script
One of the easiest ways to improve script to video results is to guide the visuals as you write. Simple bracketed cues work well, like:
• [show screenshot]
• [b-roll: typing on laptop]
• [on-screen text: key takeaway]
This makes it easier to break your script into visual beats later.
Use a CTA that feels natural
Calls to action don’t need to be loud or awkward. A simple, contextual CTA works best:
• “Try this workflow on your next video.”
• “Save this if you’ll use it later.”
• “Follow for more script-to-video tips.”
If the video delivers value, the CTA doesn’t need to push.
A simple script template you can reuse
Here’s a lightweight structure that works across platforms:
1. Hook: One clear, attention-grabbing line.
2. Promise: What the viewer will learn or get.
3. Three beats: Three short points or steps, one idea per line.
4. Proof or example: A quick result, insight, or clarification.
5. CTA: One simple next action.
Example script (and how it maps to scenes)
Script:
Most people overcomplicate turning a script into a video.
You don’t need ten tools to do it.
First, generate a clean voiceover.
Then, build visuals around the audio.
Finally, add captions and polish.
That’s it.
Scene mapping: Hook text on screen → Voiceover over simple visuals → One scene per step →Subtitles and emphasis on key words → End frame with CTA.
Good scripts make AI tools feel smarter. When the writing is clear, the video almost builds itself.
Common mistakes and quick fixes
Even with the right tools, a few small mistakes can make script to video AI results feel off. The good news is that most of them are easy to fix once you know what to look for.
• Robotic pacing: If your video sounds stiff or unnatural, the pacing is usually the problem. Long sentences delivered at the same speed flatten everything.
Quick fix: Break lines into shorter sentences, add intentional pauses, and vary sentence length to create rhythm.
• Too many visuals per sentence: Trying to match every word with a new visual overwhelms viewers and makes the video feel chaotic.
Quick fix: Stick to one clear visual beat per idea. Let visuals support the message, not compete with it.
• Unreadable captions: Tiny text, low contrast, or captions hugging the edges of the screen hurt retention.
Quick fix: Increase font size, boost contrast, keep captions inside safe margins, and highlight only key words.
• The video feels slow: Long intros, empty pauses, or unnecessary transitions drag attention down.
Quick fix: Cut straight to the hook, tighten pauses, and speed up scene changes slightly for short-form content.
• Inconsistent audio quality: Uneven volume or dull narration makes even good visuals feel amateur.
Quick fix: Apply light audio enhancement and leveling before exporting so the voice stays clear and confident throughout.
Script to video AI
Script to video AI works best when you treat it as a workflow, not a shortcut. Start with strong writing, lock in clean audio first, build visuals around that foundation, and finish with polish. When audio, visuals, and captions work together, the final video feels intentional, not automated. Tools like Async make that process smoother by keeping the most important part of the video, the voice, under your control.
FAQ
What is the best script to video AI tool?
There’s no single best tool for everyone. The right choice depends on your goal. CapCut is great for fast, social-first edits. Canva works well for clean, branded videos. Pictory and Lumen5 are strong options for turning scripts into stock-based or summary-style videos. Many creators combine these tools with a dedicated audio platform to keep voiceovers consistent and high-quality.
Can I do script to video for free?
Yes, many tools offer free tiers or trials, including CapCut and Canva. Free plans are useful for testing workflows, but they often come with limitations like watermarks, export caps, or fewer customization options. For regular publishing, paid plans usually save time and frustration.
How does CapCut script to video work with voiceovers?
CapCut lets you import a finished voiceover, auto-generate captions, and apply templates or transitions around the audio. This makes it easy to sync visuals to narration, especially for Shorts, Reels, and TikTok.
Is Canva script to video good for YouTube Shorts
Canva can work well for YouTube Shorts if you design with vertical layouts, large text, and simple animations. It’s especially useful when brand consistency matters more than trend-heavy edits.
What’s the difference between the Pictory script to video and the Lumen5 script to video?
Both tools focus on turning scripts into stock-based videos. Pictory leans more toward narration-driven and faceless content, while Lumen5 is often used for repurposing blog posts or written content into short social videos.
Should I generate audio or video first?
Audio first. Locking your voiceover before creating visuals gives you clear timing, better pacing, and more flexibility. Visuals are much easier to adjust than narration.