If you've ever uploaded a video and then spotted a clunky intro, a long pause, or a face you forgot to blur, you've probably wondered how to edit YouTube videos without re-uploading the whole thing. Good news: YouTube has a built-in editor, and for quick fixes, it's all you need.
Quick answer: YouTube Studio has a basic built-in editor that lets you trim, cut, blur, and add audio to videos directly in your browser, even after they're live, and without re-uploading. It's free and beginner-friendly, which makes it perfect for simple cleanups. But if you need advanced editing, AI tools, captions, resizing for Shorts, or a faster way to repurpose one video into many, you'll likely want a dedicated video editor instead.
That's the short version. The rest of this guide walks you through exactly how to use the YouTube Studio editor step by step, what it can and can't do, and which tools to reach for when its limits start to slow you down. By the end, you'll know precisely when YouTube's free editor is enough, and when an upgrade is worth it.
We'll cover the full workflow, a side-by-side comparison of the best YouTube video editor options, and a quick decision guide so you can pick the right tool in about thirty seconds. Let's get into it.
How to use the YouTube video editor
To use the YouTube video editor, sign in to YouTube Studio, select Content from the left menu, click the video you want to edit, then choose Editor. From there, you can trim, cut, blur, and add audio on the timeline, then click Save to publish your changes, no re-uploading required.
Here's the full step-by-step so you know how to edit YouTube videos, start to finish:
- Open YouTube Studio. Go to studio.youtube.com and sign in with your channel account. You'll land on your channel dashboard.
- Select Content. In the left-hand menu, click Content to see all your uploaded videos.
- Pick your video. Click the title or thumbnail of the video you want to edit.
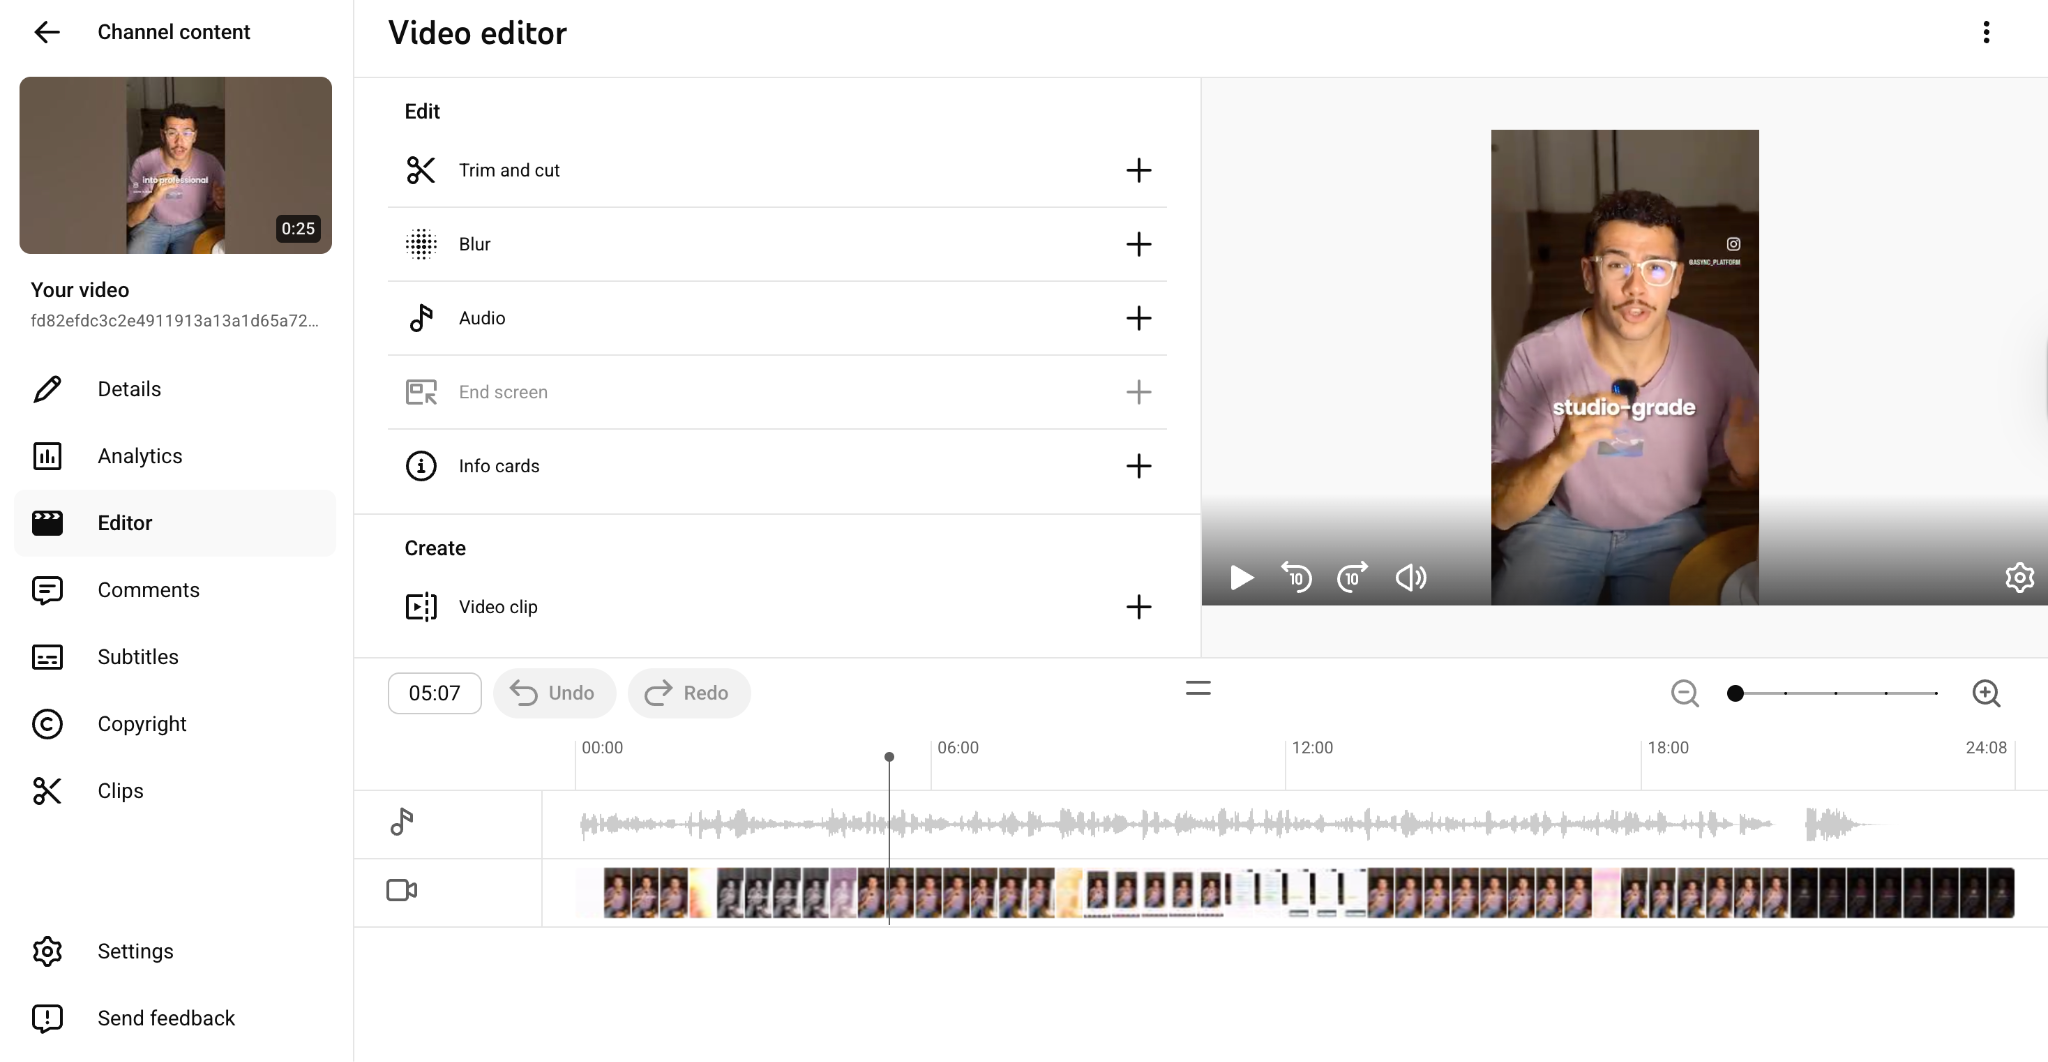
- Open the Editor. In the left menu of that video's page, click Editor. This opens the editing timeline, a preview window, and the available tools.
- Make your edits. Use Trim & cut, Blur, and Audio to adjust your video. (We'll break each of these down in the next section.)
- Preview before you commit. Use the preview button to watch your changes and make sure everything lands the way you want.
- Save. Click Save in the top-right corner. YouTube processes the edit and updates the published video.
A couple of things worth knowing before you start. Edits in YouTube Studio happen on YouTube's side, so your originally uploaded file isn't touched, but as of mid-2025, you can no longer undo changes with the "Revert to original" option once you've saved. So preview carefully.
Also, processing can take a few minutes after you save, especially for longer videos. The change won't appear instantly for viewers, so don't panic if the old version is still showing right away.
What can you do with the YouTube Studio Editor?
The YouTube Studio editor lets you trim and cut sections, blur faces or sensitive objects, add royalty-free music from the Audio Library, and insert end screens and info cards. It works on already-uploaded videos, so you can fix or improve content without re-uploading or losing your views and comments.
It's a focused toolkit rather than a full studio. Here's what each tool actually does.
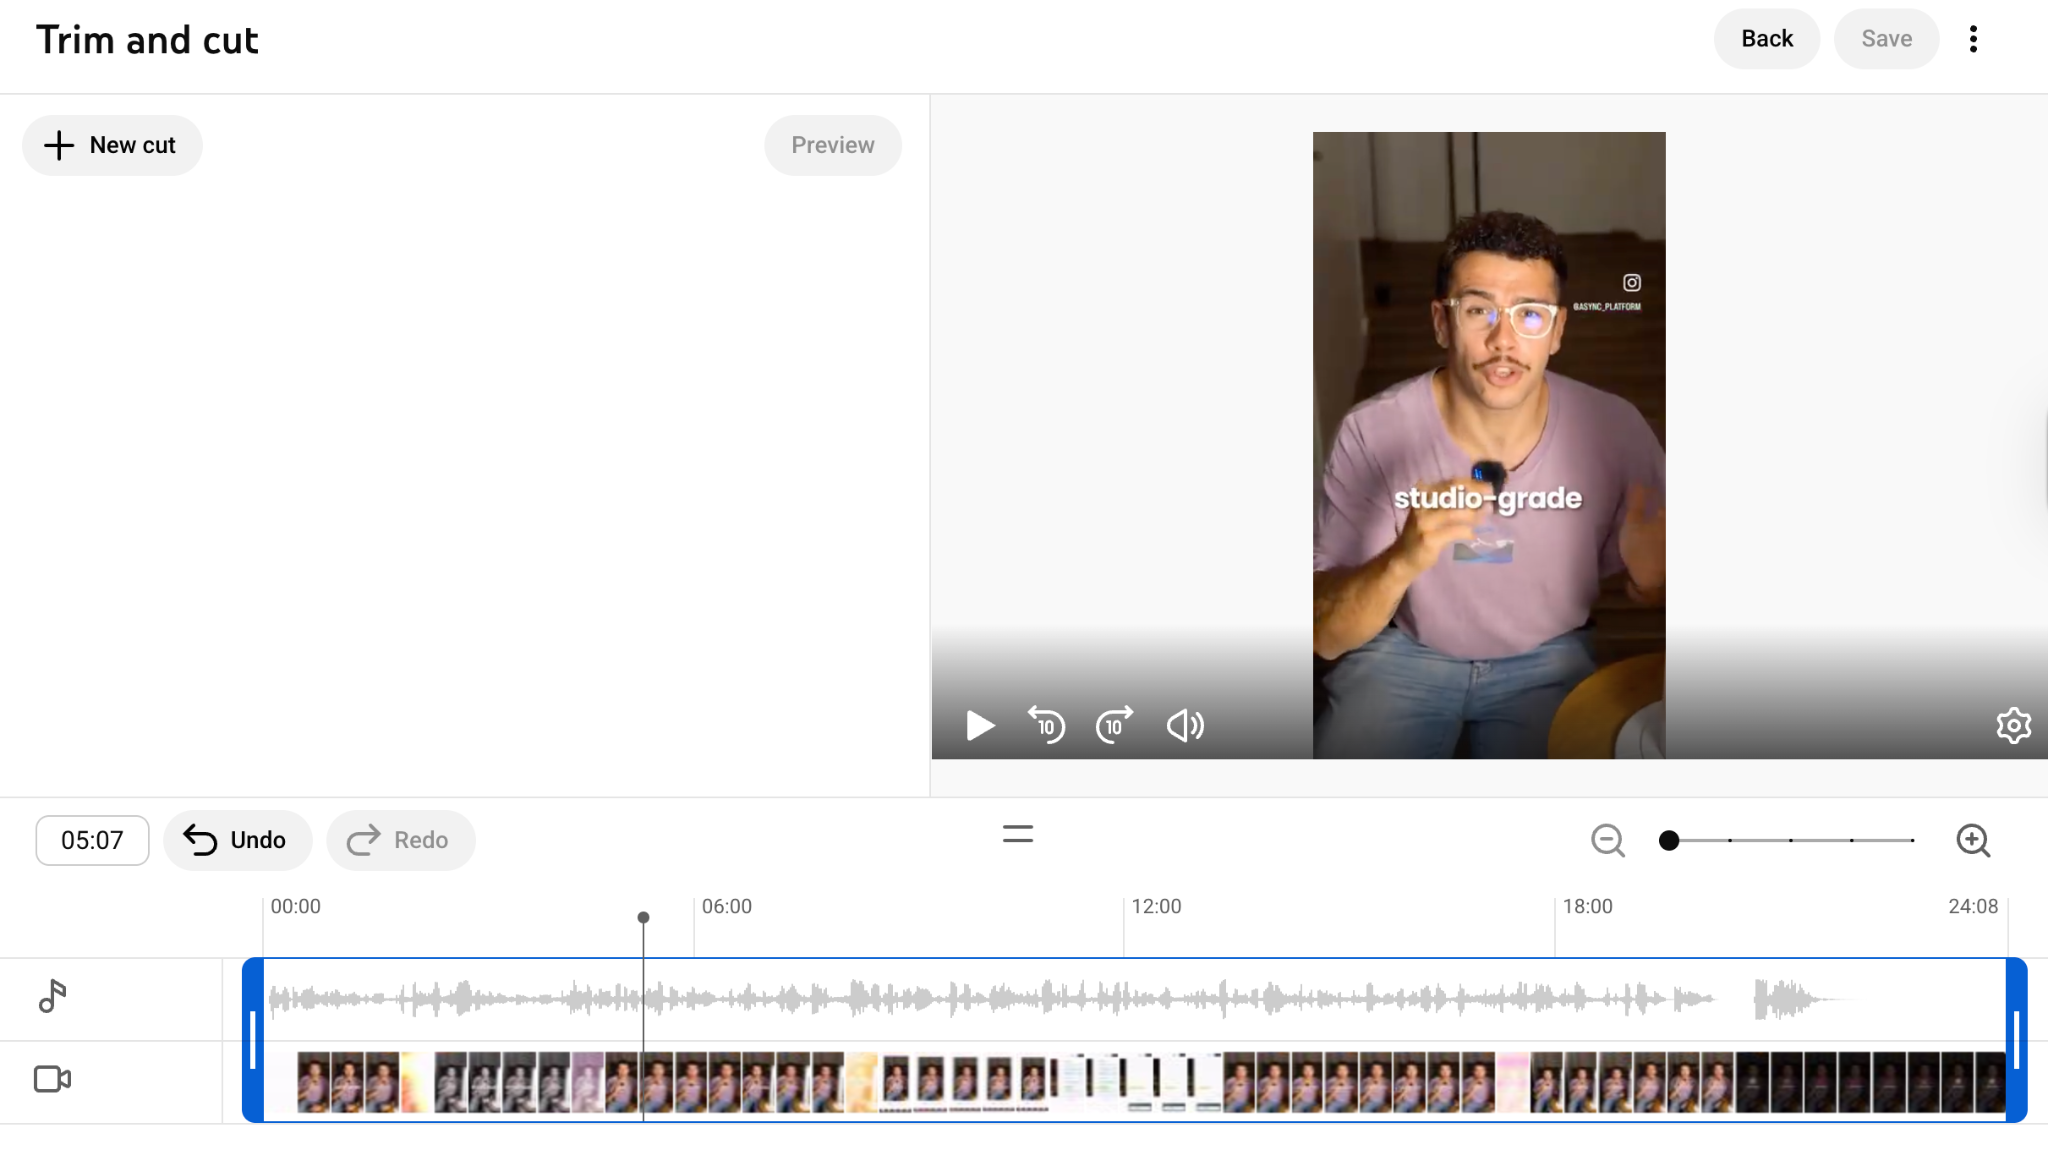
Trimming and cutting
The Trim & cut tool is the workhorse. To trim the start or end, drag the handles on the timeline so the blue box covers only the part you want to keep; anything outside the box gets removed.
Need to remove a section from the middle? Click New Cut, place your playhead where the cut should begin, and drag to select the segment you want gone. This makes the built-in tool a capable YouTube video trimmer for tightening up pacing or chopping out mistakes.
If you only need to trim a YouTube video down to its best moments, this single feature covers most everyday needs. It's also the fastest way to act as a YouTube video cutter when you want to drop a sponsor read, an awkward silence, or a flubbed take.
Blurring faces and objects
The Blur tool gives you two options. Face blur uses automatic face detection, YouTube scans the video, finds faces, and lets you select which ones to hide. Custom blur lets you draw your own blur box over anything: a license plate, an address, a logo, or any detail you don't want on screen.
You can shape the blur (rectangle or oval) and choose whether it stays fixed in one spot or tracks an object as it moves through the frame. This is genuinely useful for privacy, and it's one of the few edits you can make even on videos that are otherwise locked for changes.
Adding and changing audio
Click Audio to open the YouTube Audio Library, a collection of royalty-free, monetization-safe music and sound effects. Browse by mood or genre, or search for a specific track, then drop it onto the audio timeline.
You can preview tracks before adding them and adjust where the music starts and stops. It's not a full audio mixing suite, but for adding a background track to a silent intro or replacing copyright-flagged audio, it does the job.
End screens and info cards
Beyond pure editing, the Studio editor lets you add end screens (those clickable cards in the final seconds that promote other videos or your subscribe button) and info cards (small pop-up links during the video). These don't change your footage, but they're part of the same editing workflow and help keep viewers watching more of your content.
Editing videos that are already live
The biggest advantage here is that all of this works on published videos. Spotted a problem after upload? You can fix it in place without deleting the video, re-encoding, and re-uploading, which means you keep your view count, comments, and watch history intact.
One caveat: for unedited videos that have passed 100,000 views, YouTube may restrict your ability to save changes (other than blurring faces) unless your channel is in the YouTube Partner Program. So big videos have guardrails.
Where the YouTube video editor falls short
The YouTube Studio editor is great for quick fixes but limited for serious creation. It has no multi-track timeline, no transitions, text overlays, or effects, no way to resize video for Shorts or other platforms, minimal AI features, and no real repurposing tools. For polished creator or marketing videos, most people need a dedicated editor.
It's important to be clear-eyed about this. The built-in editor was designed for post-upload cleanup, not for building videos from scratch. Once you try to do anything more ambitious, the gaps show up fast.
- Limited creative control: There are no titles, captions, you can style, transitions between clips, color correction, speed ramps, or visual effects. If your video needs to look produced, the Studio editor can't get you there.
- A bare-bones timeline: You're working with a single video track and a single audio track. You can't layer footage, overlay a logo, add a picture-in-picture webcam, or stack multiple clips. Real editing needs real layers.
- Barely any AI: Modern editing leans heavily on AI for auto-captions, silence removal, filler-word cleanup, and clip generation. The Studio editor doesn't meaningfully offer these, so anything "smart" has to happen elsewhere.
- No resizing or reformatting: You can't change your video's aspect ratio inside YouTube Studio. So you can't turn a horizontal video into a vertical 9:16 clip for Shorts, Reels, or TikTok. That's a major limitation in 2026, where short-form is often where the growth is.
- No repurposing: There's no way to automatically pull highlights from a long video, generate multiple short clips, or adapt one piece of content into several formats. If repurposing is part of your strategy, you'll be doing it all by hand somewhere else.
- Not built for marketing-grade output: For brand videos, course content, client work, or anything where polish matters, the built-in tools simply weren't designed to deliver that level of finish.
None of this makes the Studio editor bad, it makes it basic. The trick is knowing when "basic" stops being enough and reaching for the right alternative.
For a closer look at adapting horizontal videos into vertical formats, see our guide on how to reframe a video with AI tools.
Best YouTube video editor alternatives
The best YouTube video editor depends on your goals. CapCut and iMovie are great free starting points, DaVinci Resolve and Premiere Pro suit advanced editing, Descript and VEED shine for talking-head and caption-heavy content, and all-in-one workflow tools like Async are ideal for creators who want to edit, caption, and repurpose in one place.
Below is a quick comparison, followed by a short rundown of each tool so you can match one to how you actually work.
Comparison table
Pricing tiers are general — always check each tool's current plans before committing.
CapCut
CapCut is the go-to free editor for short-form, and it's hard to beat for the price. Built by ByteDance (TikTok's parent company), it offers templates, trending effects, transitions, animated text, and 4K export across mobile, web, and desktop. It's one of the most-used video apps in the world, and it's especially strong for Shorts and quick social edits. The trade-off: it's less suited to long, complex projects.
iMovie
If you're on a Mac or iPhone and have never touched an editor, iMovie 0 is a friendly starting point. It's free, simple, and covers the basics, trimming, titles, transitions, and a bit of music. You'll outgrow it as your ambitions grow, but it's a low-stress way to learn the ropes.
Filmora
Wondershare Filmora hits the sweet spot between simple and powerful. Drag-and-drop editing, a big library of effects, transitions, and music, and a gentle learning curve make it ideal for beginners who want more than iMovie without the intimidation of pro software. The free version adds a watermark; paid plans remove it and unlock the full library.
Adobe Premiere Pro
Premiere Pro is the industry-standard desktop editor, widely used in agencies, newsrooms, and by full-time YouTubers. It's enormously flexible, with deep plugin support and tight integration with the rest of Adobe's tools. It's subscription-based and has a real learning curve, so it's overkill for casual editing, but unmatched once your projects get complex.
DaVinci Resolve
DaVinci Resolve is famous for its node-based color grading, which has no real equal, plus Fusion visual effects and Fairlight audio, all in a genuinely capable free version. It's a favorite for cinematic content and finishing work. The catch is the steep learning curve, so it rewards creators who are ready to invest the time.
Final Cut Pro
Mac-only and a one-time purchase rather than a subscription, Final Cut Pro is loved for its speed and ultra-fast exports, especially on Apple silicon. Its magnetic timeline and proxy workflows make it efficient for managing large content libraries. If you're committed to the Apple ecosystem and want pro power without a recurring bill, it's a strong pick.
Descript
Descript flips editing on its head with text-based editing: it transcribes your video, and you edit the footage by editing the transcript, like a document. That makes it superb for dialogue-driven content, podcasts, interviews, tutorials, and talking-head videos. It also packs AI tools and direct YouTube publishing, though it can lag on very long files.
VEED
VEED is a browser-based editor that punches above its weight on captions and translation, supporting well over a hundred languages. It's a solid choice if your priority is accurate subtitles, localized versions of your videos, and quick edits without installing software.
Canva
Better known for graphic design, Canva also offers a surprisingly capable, template-driven video editor. For marketers and non-editors who want a polished result fast without learning a timeline, it's an easy, accessible option that lives right alongside your other brand assets.
Async: the all-in-one workflow option
Here's where things get interesting for creators who feel boxed in by basic editing. Async isn't just another timeline editor, it's an all-in-one AI creative studio built around a single idea: create once, then turn that one video into many.
Instead of jumping between a trimmer, a caption tool, a translator, a clip generator, and a resizing app, Async folds the whole workflow into one place. You can record or upload footage, edit it with AI-assisted tools, and then put the rest of the process on autopilot:
- AI captions and subtitles are generated automatically, with styling and animated text, and translation into 100+ languages, so your videos travel.
- AI clip generation that scans a long video, finds the strongest moments, and turns them into short clips ready for Shorts, Reels, and TikTok.
- Reframing and resizing so a single horizontal video becomes vertical or square without you cropping scene by scene.
- AI transcription that converts your video into editable text you can repurpose into blog posts, show notes, or scripts.
- AI voices, text-to-speech, and dubbing powered by Async's own models, plus a developer-friendly Voice API for building voice into your own apps.
The result is less tool-hopping and far less manual work. If your bottleneck isn't ideas but production, keeping up with captions, clips, and formats across platforms, Async is built for exactly that. You can sign up here to try it.
For more on choosing between lightweight editors, see our breakdown of the best CapCut alternatives, and our guide to repurposing long videos into Shorts.
Which YouTube Video Editor Should You Choose?
Choosing the right editor comes down to what you're making and how much you want to learn. For quick after-upload fixes, the YouTube Studio editor is enough. For short-form, beginners, AI editing, or repurposing, a dedicated tool will save you hours. Match the tool to your main use case below.
Here's a fast decision guide for how to edit YouTube videos based on your needs:
- You just need to trim or blur a published video → Stick with the YouTube Studio editor. It's free and already there.
- You're a total beginner → Try iMovie (Apple) or Filmora (Windows/Mac) for a gentle learning curve.
- You make Shorts and short-form → CapCut is fast, free, and built for vertical video.
- You want AI to do the heavy lifting → Async or Descript automate captions, clips, and repurposing.
- You need professional desktop editing → Adobe Premiere Pro for flexibility, DaVinci Resolve for color, Final Cut Pro for speed on Mac.
- You edit mainly on mobile → CapCut or Filmora are built for phone-first workflows.
- You caption or translate a lot → VEED or Async lead on subtitles and multi-language support.
- You repurpose one video into many → Async turns long videos into clips, captions, and multiple formats in one place.
If you find yourself reaching for three or four different tools to finish one video, that's the signal it's time for an all-in-one workflow rather than another single-purpose app.
The Bottom Line: Edit Less, Create More
So, do you really need a fancy editor? Not always. If your goal is to chop a clip, blur a face, or swap a soundtrack on a video that's already live, the YouTube Studio editor handles it for free in a couple of clicks, no downloads, no fuss. For a huge number of creators, that's genuinely enough.
But the moment you want to build something, layered visuals, polished captions, vertical clips for Shorts, or one video reshaped into five pieces of content, the built-in tools tap out. That's not a failure of YouTube; it's just not what the Studio editor was made for. Knowing how to edit YouTube videos well is really about knowing which tool to reach for at which moment.
The honest takeaway: keep YouTube Studio in your back pocket for quick fixes, and pair it with a dedicated editor for everything else. If that "everything else" includes captions, clips, translations, and repurposing, the stuff that eats your afternoons, an all-in-one workflow will give you those afternoons back.
That's exactly the gap Async was built to fill: record, edit, caption, resize, and repurpose without ever leaving one tab. Spend less time wrestling with tools and more time actually creating. Try Async free and turn your next long video into a week's worth of content.
Frequently Asked Questions
Does YouTube have a built-in video editor?
Yes. YouTube has a free built-in editor inside YouTube Studio. It lets you trim, cut, blur faces or objects, add royalty-free audio, and insert end screens and cards, all in your browser, without downloading software. It's designed for simple edits rather than full production work.
How do I edit YouTube videos after uploading?
To edit a YouTube video after uploading, open YouTube Studio, click Content, select the video, and choose Editor. You can trim, cut, blur, and adjust audio on already-published videos and click Save, without re-uploading. Your views, comments, and likes stay intact through the edit.
Can I trim a YouTube video in YouTube Studio?
Yes. To trim a YouTube video, open the Trim & cut tool in the YouTube Studio editor, then drag the timeline handles to cut the start or end, or use New Cut to remove a middle section. It works as a built-in YouTube video trimmer, though note that you can't undo edits once saved.
What is the best YouTube video editor?
There's no single best YouTube video editor; it depends on your needs. Premiere Pro and DaVinci Resolve lead for professional desktop editing, CapCut for Shorts, and Descript for talking-head content. For creators who want to edit, caption, and repurpose in one workflow, Async is a strong all-in-one choice.
What is the best free YouTube video editor?
The best free YouTube video editor for most people is CapCut, thanks to its templates, effects, and 4K export. DaVinci Resolve offers the most powerful free option for advanced editing, iMovie is ideal for Apple beginners, and the YouTube Studio editor is perfect for free, quick fixes after upload.