Better retention usually comes from five things: a stronger opening, tighter pacing, captions people can read at a glance, visual changes that move the idea forward, and cutting anything that delays your point. Learning how to edit Instagram Reels for retention is less about speed and more about sequence. Below are 17 edits, each with a before-and-after example and one specific change you can make on your next Reel.
None of these are rules. They are decisions, and the right decision depends on what you are filming and who you are filming it for.
What is retention editing?
Retention editing means shaping a video so viewers keep choosing to stay, second by second. Every cut, caption, and cutaway either earns the next moment of attention or spends it.
It is not the same as cutting fast. A rapid-fire edit on a slow idea still loses people, because the problem was never the pace of the cuts. It was the pace of the information. Plenty of Reels that hold attention well sit on a single shot for eight or ten seconds, because something is actually developing inside that shot.
The useful question is not "how often should I cut?" It is "What is the viewer learning right now, and does the next second give them something new?" Short-form video editing that answers yes repeatedly tends to hold people. Editing that answers no, even for two or three seconds, is where drop-off occurs.
Two things follow from that. First, retention work starts in the script and the shot list, not the timeline. Second, you cannot evaluate your own edit by feel, because you already know what happens next. You need the data, which is covered in tip 17.
17 Instagram Reels editing tips that improve retention
Each tip below covers what to change, why it affects retention, a before-and-after from a real edit, and one thing you can do to your next Reel in under five minutes.
1. Start with the result, not the run-up
What to change: Move your strongest moment, the finished result, the surprising number, the punchline, into the first two seconds.
Why it affects retention: The opening frames decide whether someone stops scrolling. A build-up that pays off at 0:20 asks for trust you have not earned yet.
Before and after: A recipe Reel opened with a four-second shot of raw ingredients on a counter. Re-cut, it opened on the finished dish being pulled apart, then jumped back to the ingredients. Same footage, reordered.
Try this: Scrub your timeline and find the single most visually interesting frame. Drag that clip to position zero and rebuild around it.
2. Delete greetings and setup
What to change: Cut "hey guys," "so today I wanted to talk about," and any sentence explaining what you are about to explain.
Why it affects retention: Viewers arrive mid-scroll with no context and no loyalty. A greeting spends attention on nothing.
Before and after: A creator's original open ran "Hey everyone, welcome back, today I'm going to show you three ways to fix your lighting." Trimmed, it became "Your lighting looks flat because of this one thing." Six seconds removed.
Try this: Play your first spoken sentence. If a stranger could skip it and lose nothing, delete it.
3. Make the first frame make sense with the sound off
What to change: Add a short on-screen line to frame one, and choose an opening frame that reads instantly.
Why it affects retention: A large share of Reels start muted. A face mid-sentence with no text gives a silent viewer nothing to hold on to.
Before and after: Before, frame one was a talking head mid-blink against a plain wall. After, the same frame carried four words across the upper third: "Stop lighting your face." Nothing else changed.
Try this: Export frame one as a still, look at it with no sound and no context, and ask whether you would know what the video is about.
4. Cut silence and repeated phrases
What to change: Close the gaps between sentences and remove the second attempt at a line you said twice.
Why it affects retention: Dead air reads as low value. Half a second of silence repeated fifteen times is seven wasted seconds spread across the whole Reel, which is worse than one long pause because it dulls everything.
Before and after: A 64-second talking head with natural breathing pauses came down to 48 seconds with no lines removed. The script was identical. Only the gaps went.
Try this: Zoom into your waveform and look for flat sections. Anything over roughly 0.4 seconds mid-sentence is usually removable without sounding rushed.
5. Change the visual when the idea changes
What to change: Tie your cuts to the structure of what you are saying, so a new point arrives with a new image.
Why it affects retention: Visual change signals progress. When the picture holds still through three separate ideas, viewers assume nothing is happening.
Before and after: A three-tip Reel played as one unbroken medium shot. Re-cut, each tip got its own framing: medium, close-up, then over-the-shoulder. Same audio, three visual beats.
Try this: Mark your script where the topic shifts. Those marks are your cut points, not a stopwatch.
6. Use B-roll to carry the explanation
What to change: Replace the parts of your talking head where you describe something with footage of that thing.
Why it affects retention: Showing is faster than telling, and it removes the gap between hearing a description and picturing it.
Before and after: "I moved the light about a foot to the left" played over a face. After, the same line played over a two-second clip of a hand sliding a softbox. The line stayed. The picture did the work.
Try this: Highlight every noun in your script that exists physically. Each one is a B-roll candidate. If you are working at volume, it is worth learning to match B-roll to your script automatically instead of hunting clip by clip.
7. Write captions people can scan, not read
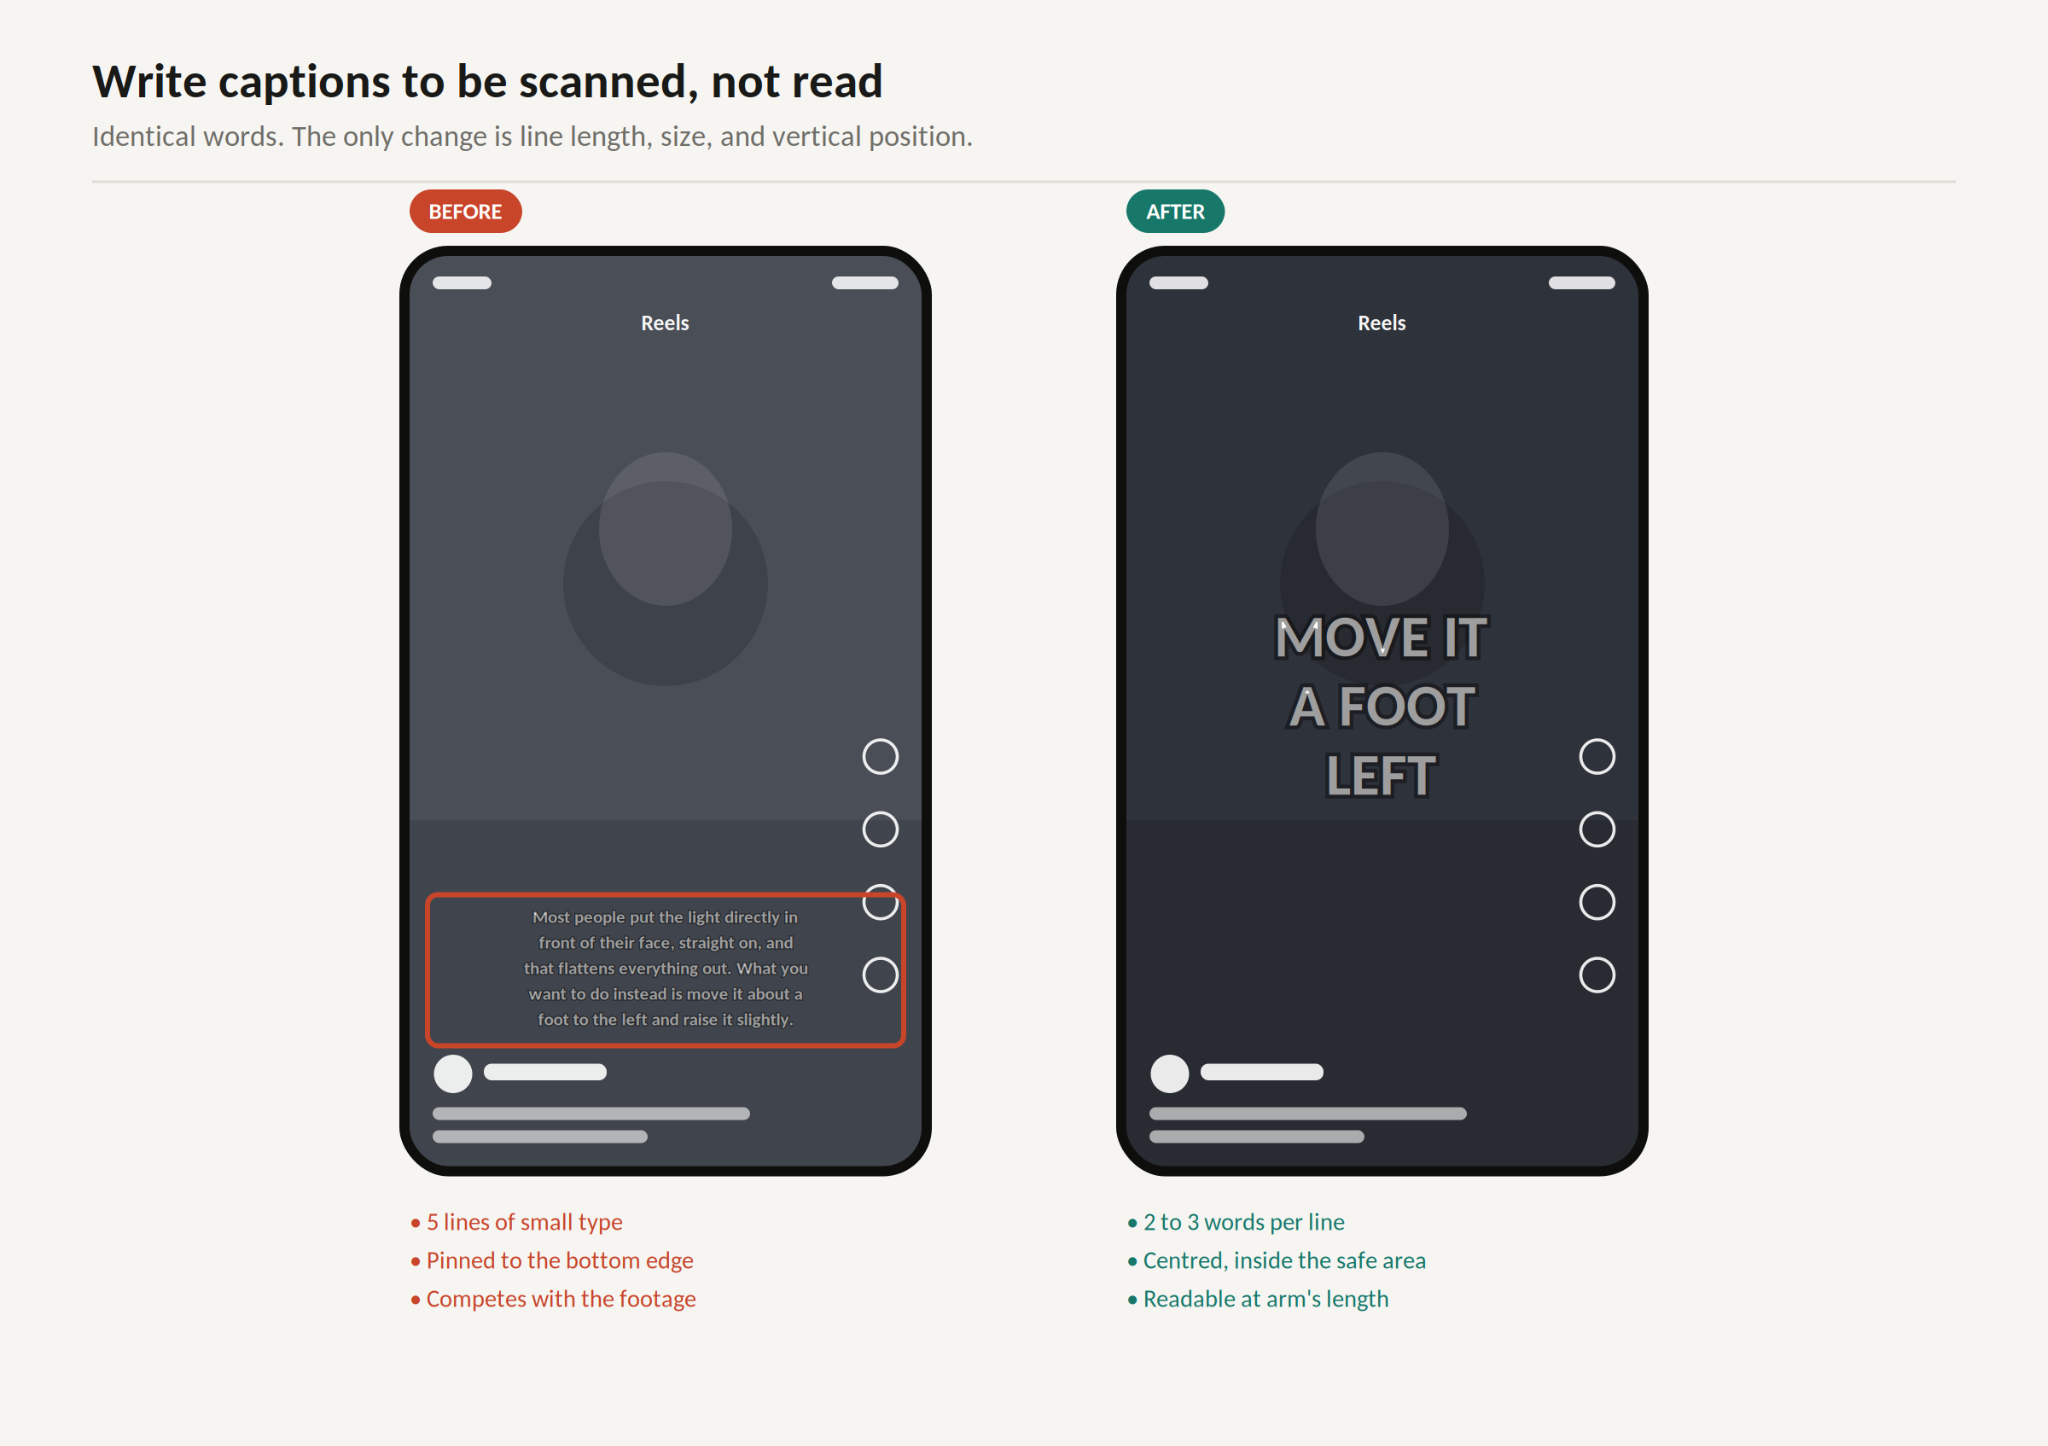
What to change: Break captions into two or three words per line, raise the font size, and place them in the middle third of the frame.
Why it affects retention: Instagram Reel captions compete with your own footage. Dense blocks force a choice between reading and watching, and viewers often resolve that by leaving.
Before and after: Before: five lines of 24px text pinned near the bottom. After: two words per line at roughly double the size, centered vertically. Word for word identical.
Try this: View your caption at arm's length on a phone. If you squint, it is too small. Our full walkthrough on how to add captions to your Reels covers styling and timing in more detail.
H3: 8. Emphasize a few words, not most of them
What to change: Highlight one word per line at most, and only where the meaning turns.
Why it affects retention: Emphasis works by contrast. Color every keyword, and the viewer's eye stops distinguishing anything, which makes the whole caption harder to parse.
Before and after: A caption track highlighted eleven words in a 20-second Reel. Cut to three, the highlights actually landed on the numbers that mattered.
Try this: Count your highlights. If more than one in ten words is emphasized, remove some.
9. Keep everything inside the safe area
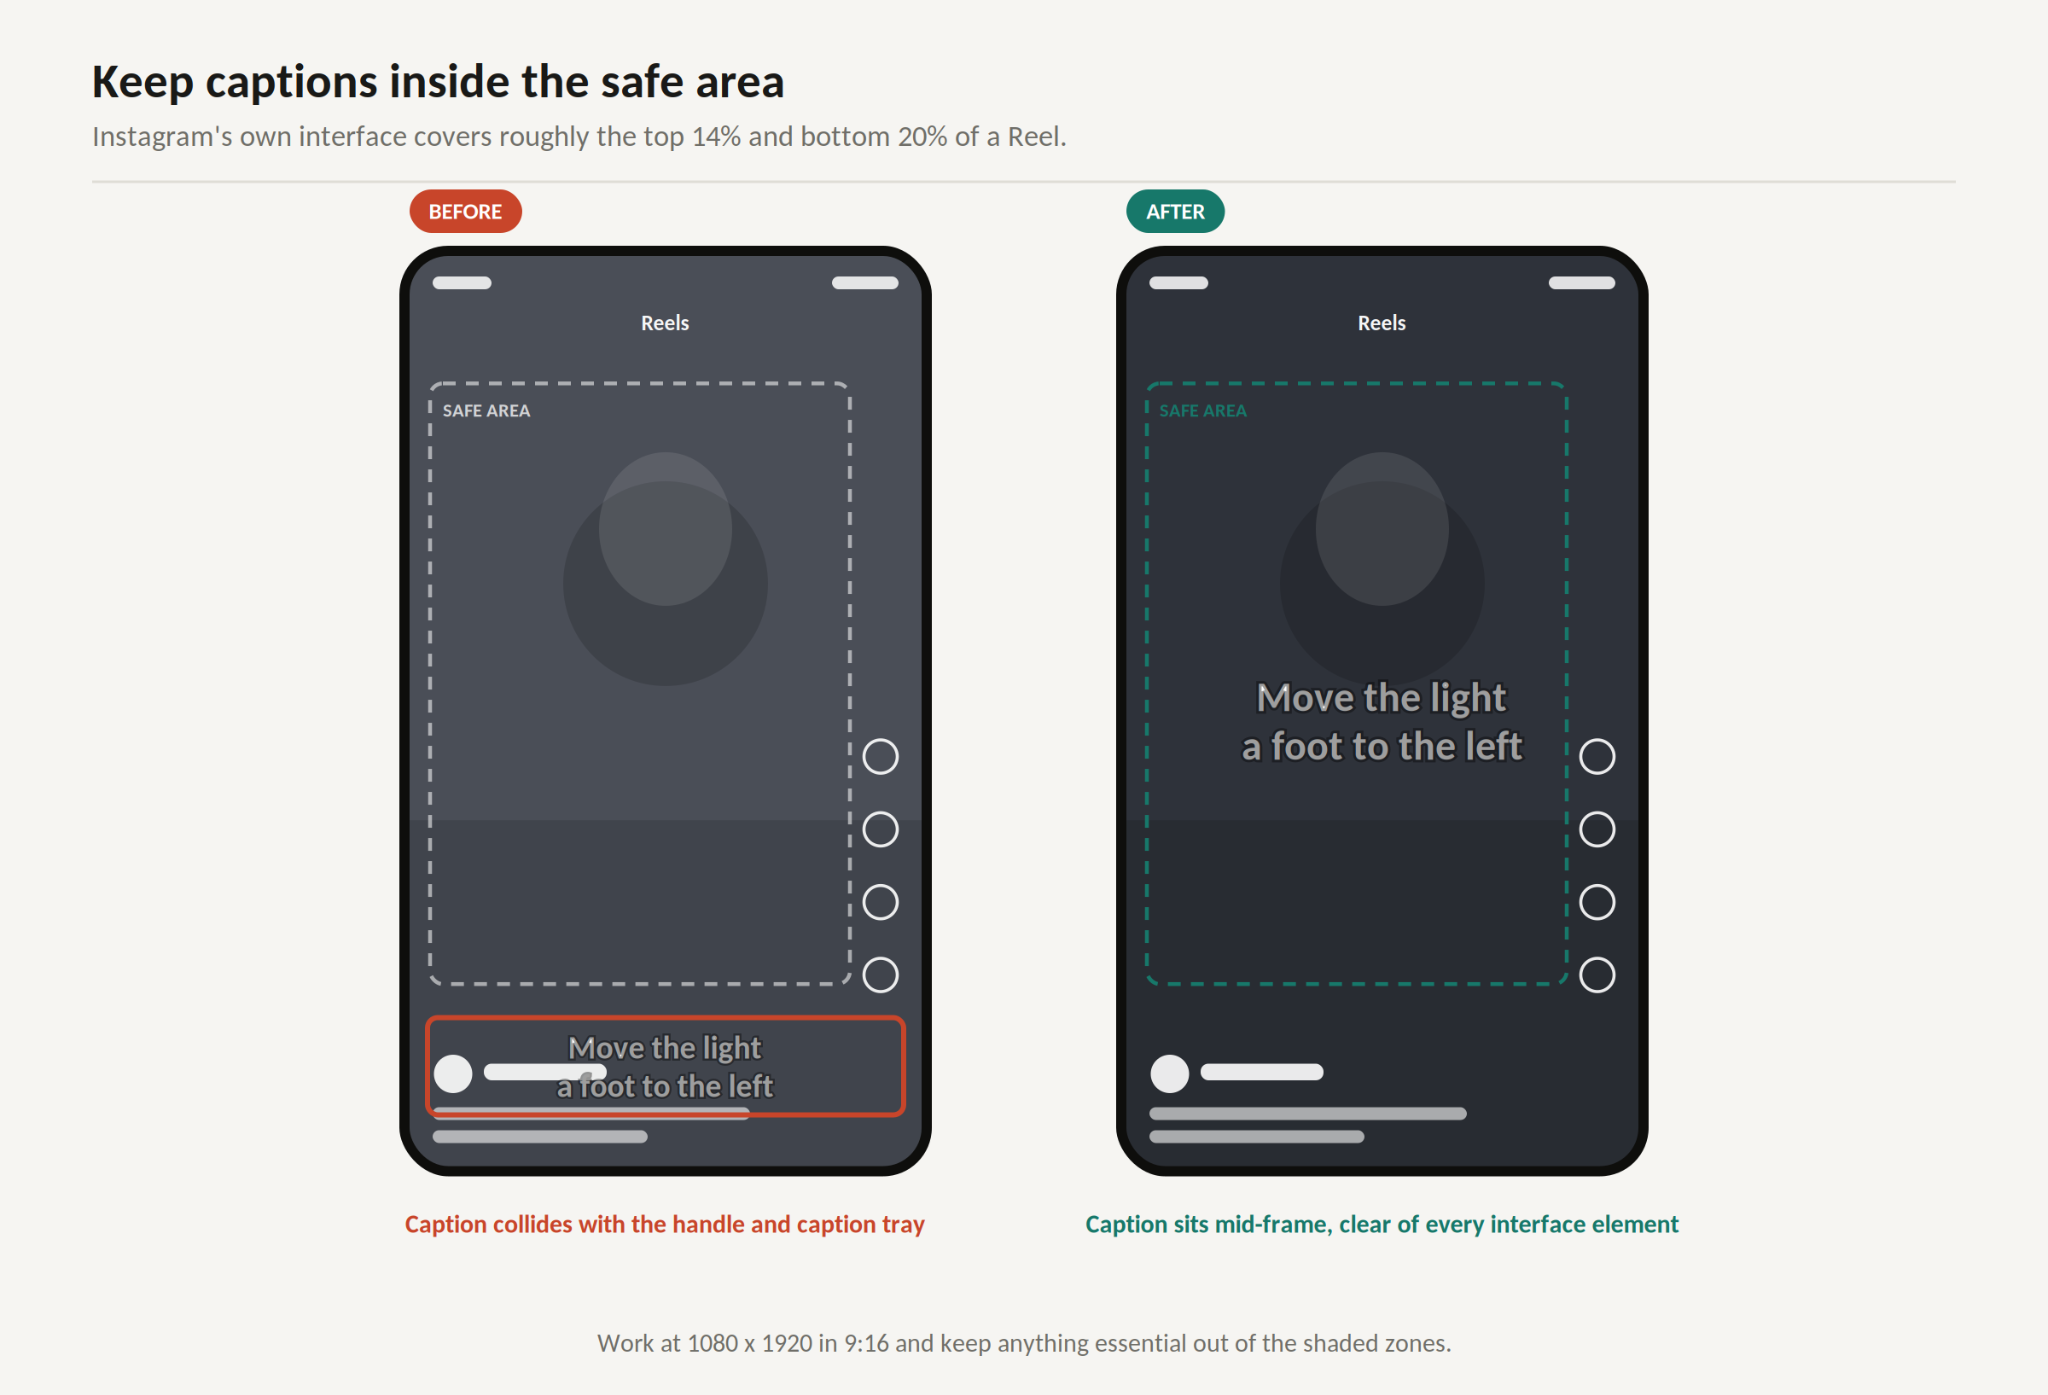
What to change: Pull text and key subjects away from the top and bottom of the frame, clear of the Instagram interface.
Why it affects retention: Captions buried under the username, share icons, or the caption tray simply do not get read, and a viewer who cannot read your point leaves before it arrives.
Before and after: A caption sat 120px from the bottom edge and was half-covered by the account handle on smaller devices. Moved to the vertical center, it was legible on every phone tested.
Try this: Work at 1080x1920 in 9:16 and keep roughly the top 14% and bottom 20% free of anything essential. Our guide to Instagram Reel size has the current numbers if you need exact Instagram Reels dimensions.
10. Give every pattern change a job
What to change: Keep zooms, angle switches, text cards, and speed ramps only where they do something.
Why it affects retention: A pattern change is a small promise that something new is coming. Break that promise often enough, and viewers stop responding to the signal.
Before and after: A Reel used a punch-in zoom eleven times in 30 seconds, including mid-sentence. Reduced to three, each landing on a key claim, the zooms stopped feeling like a tic.
Try this: For every effect on your timeline, write the reason it is there. If you cannot, remove it.
11. Compress screen recordings hard
What to change: Crop to the region that matters, speed up navigation, and zoom in on the cursor at the moment of action.
Why it affects retention: Full-desktop captures are unreadable on a phone in 9:16, and menu-hunting in real time is the slowest content on the internet.
Before and after: A 22-second screen recording of a settings walkthrough became nine seconds: cropped to the panel, sped up 2x through the scrolling, real time only on the click that mattered.
Try this: Watch your screen recording on a phone. Anything you cannot read at that size gets cropped or cut.
12. Cut to a close-up when detail matters
What to change: Insert a tight shot at the exact moment you reference a small detail.
Why it affects retention: The detail that the viewer cannot see creates a small failure. They were told to look; they looked, and nothing was there.
Before and after: "See how the stitching runs diagonally here" played on a wide product shot where the stitching was three pixels wide. A close-up insert made the claim visible and the sentence worth its time.
Try this: Every time your script says "here," "this," or "look at," check whether the frame actually shows it.
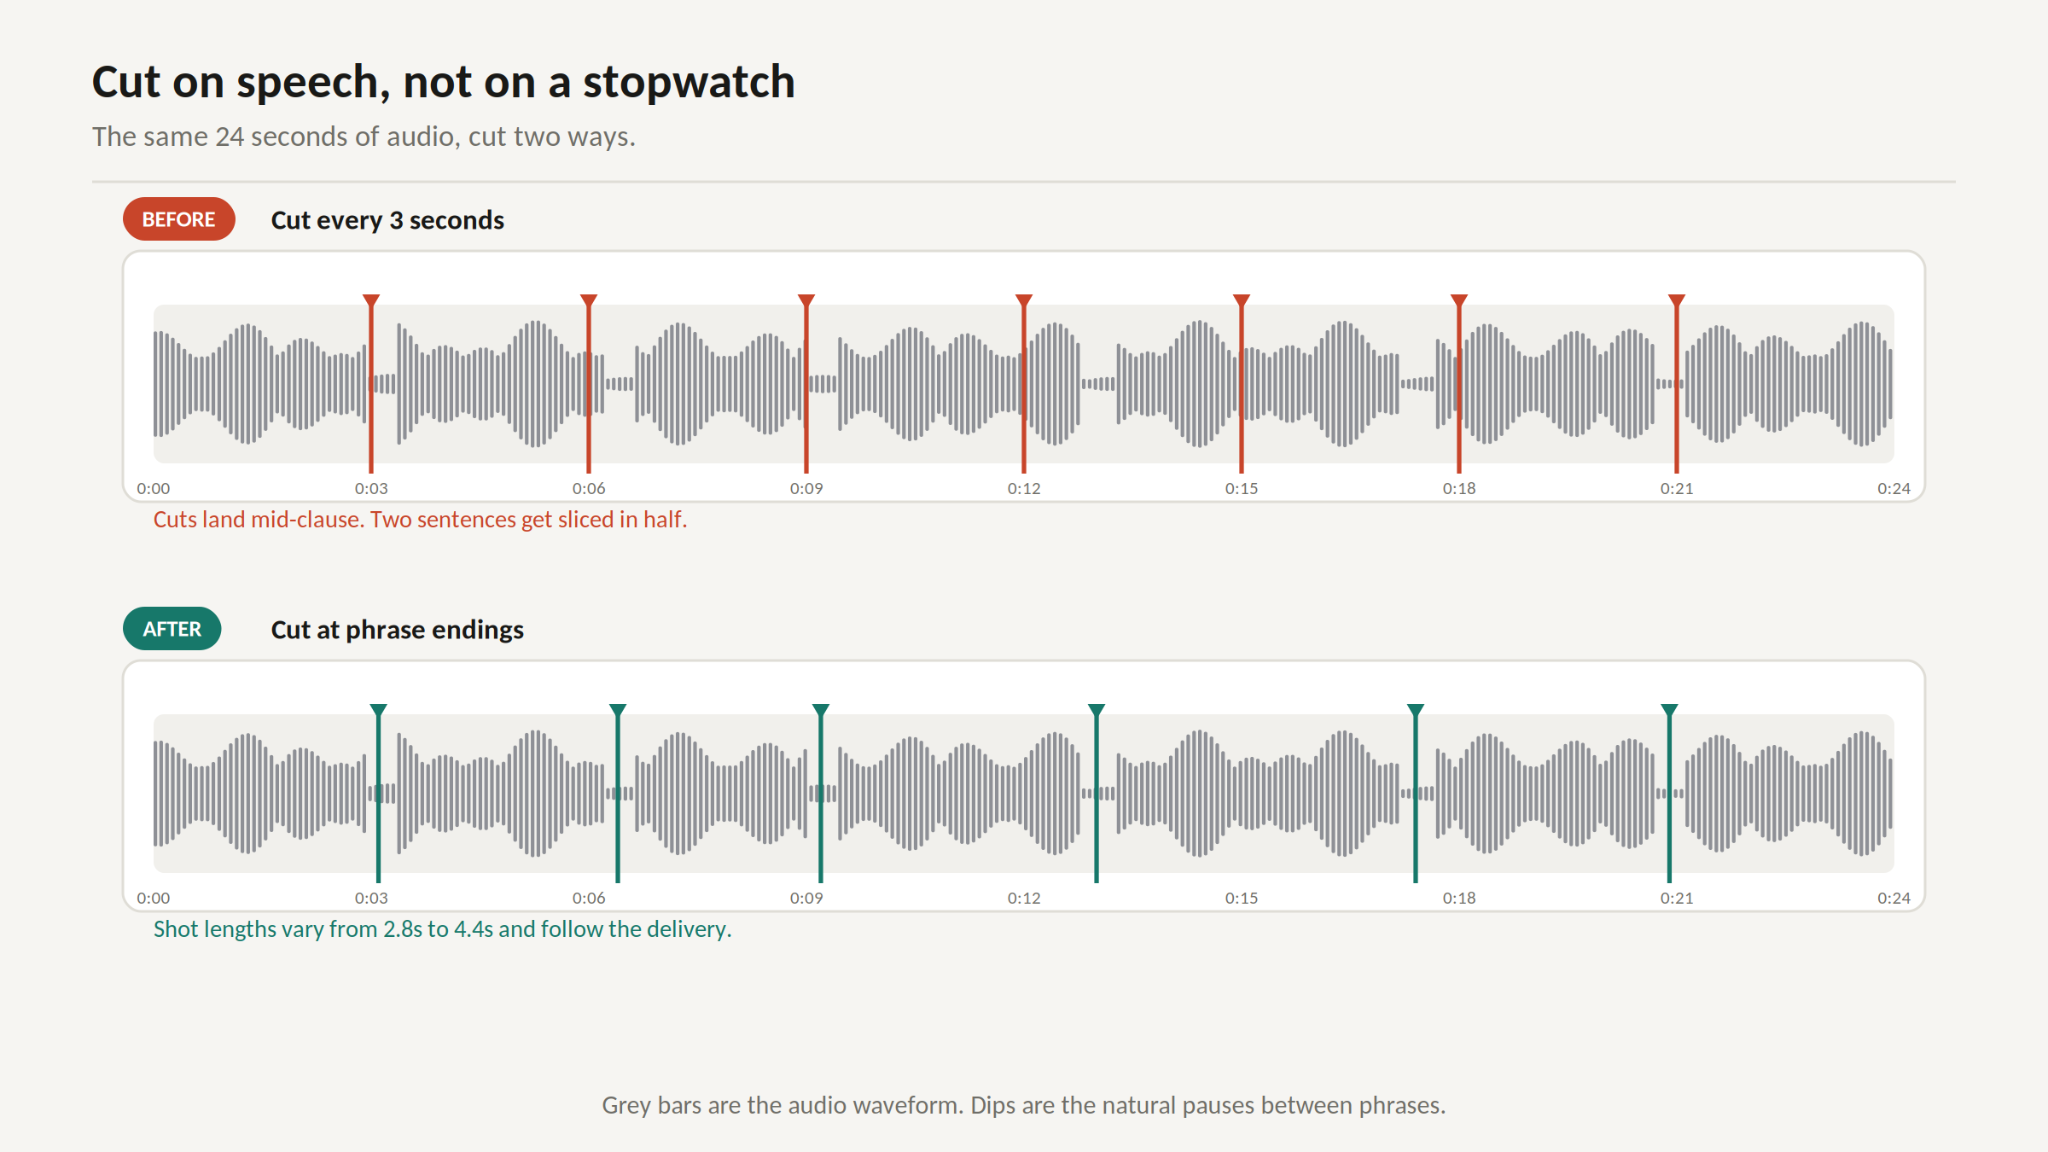
13. Cut on speech, not on a stopwatch
What to change: Place cuts at natural phrase boundaries instead of a fixed interval.
Why it affects retention: Cutting on a grid interrupts sentences and creates a rhythm that fights the delivery. Viewers feel the mismatch even when they cannot name it.
Before and after: An edit with a cut every three seconds sliced two sentences mid-clause. Re-cut on phrase endings, the shot lengths varied between 1.5 and 6 seconds, and the Reel read as more controlled rather than less.
Try this: Turn off any auto-cut interval and place markers by ear first, then trim to them.
14. Make Reels transitions serve the story
What to change: Use a transition where the story moves, and a straight cut everywhere else.
Why it affects retention: A whip pan between two locations helps. The same whip pan mid-sentence adds a beat of confusion, and confusion is the most reliable cause of drop-off there is.
Before and after: A morning routine Reel used the same spin transition between every clip, including two clips shot in the same room. Cut down to two transitions, both marking a genuine change of place, the sequence became easier to follow.
Try this: Keep transitions for changes in time, place, or topic. Everything else is a cut.
15. Mix music under speech, not over it
What to change: Drop the music well below your voice and duck it further under key lines.
Why it affects retention: If viewers have to work to hear you, they leave. Loud music is one of the fastest ways to lose someone who was otherwise interested.
Before and after: A track sitting close to voice level made the middle third of a Reel hard to follow on phone speakers. Lowered substantially and ducked under each spoken line, the same track added energy without competing.
Try this: Listen once on phone speakers at half volume. That is closer to real viewing conditions than headphones.
16. End on the payoff
What to change: Cut everything after your final point. No sign-off, no trailing pause, no fade.
Why it affects retention: Reels loop. A clean end into a strong first frame can send viewers into a second pass, while four seconds of "thanks for watching" guarantees an exit.
Before and after: A Reel ended with five seconds of waving and a subscribe reminder. Removed, the last frame became the finished result, which looped straight back into the opening shot of the same result.
Try this: Trim to the last frame that carries information, then check how the final frame flows into frame one.
H3: 17. Read the retention curve and re-edit
What to change: Open Insights, find where the graph drops, and fix that specific second.
Why it affects retention: Guessing is expensive. The curve tells you exactly which edit failed, and the fix is usually something you would never have suspected.
Before and after: A Reel dropped sharply at 0:07. The footage there was a four-second static shot while the creator set up a comparison. Cut to one second with a text card; the same Reel re-posted held noticeably longer through that section.
Try this: Check the retention graph on your last five Reels and note the timestamp of each drop. Patterns show up fast, and they are usually about pacing rather than topic.
H2: The 17 tips at a glance
Before-and-after Reel examples
Example 1: A weak opening versus a stronger hook
The original opened on a wide shot of a desk while the creator said, "Hey, so a few of you asked about my setup." Nothing on screen, nothing said, four seconds gone. The revision opened on a close-up of the finished setup with three words overlaid, then cut to the same wide shot at 0:02.
Example 2: A slow talking head versus a tighter edit with B-roll
The original ran 58 seconds on one camera angle. The revision cut silence, added five B-roll inserts on the physical nouns in the script, and switched framing at each of the three script beats. Runtime came down to 41 seconds with the full script intact.
Example 3: Dense captions versus readable captions
Identical words, two treatments. The first uses five lines of small text near the bottom edge, partly overlapped by the interface. The second uses two words per line at roughly double the size, centered vertically, clear of the safe area boundaries.
The mute test: a 30-second check before you publish
Here is a check worth running on every Reel, and almost nobody does it.
Put your phone at arm's length, turn the sound completely off, and play your Reel once at normal speed. Do not scrub, do not pause, do not lean in. Then write down, from memory, what you think the video was about.
Three things usually surface immediately.
You will find the frame where you lost the thread. There is almost always one moment where, without audio, the picture stops explaining anything. That moment is where your retention curve is going to dip, and you found it before publishing rather than three days after.
You will find captions you cannot actually read. Text that looks fine at 14 inches on a laptop often fails at arm's length on a phone in daylight. Arm's length is the real viewing distance.
You will find out whether your hook works. If you cannot describe the topic after watching the first two seconds muted, neither can a stranger scrolling by.
Run the test twice: once before you add captions, to check whether your footage carries meaning on its own, and once after, to check whether the captions are doing the job you assigned them. The version that passes both is usually the version worth posting.
How to edit Instagram Reels with Async
Async is an AI video editor built for exactly this kind of work, and the workflow below follows the order most creators find fastest.
- Upload your footage. Drop raw clips into a new project. Async processes the audio and generates a transcript you can edit against.
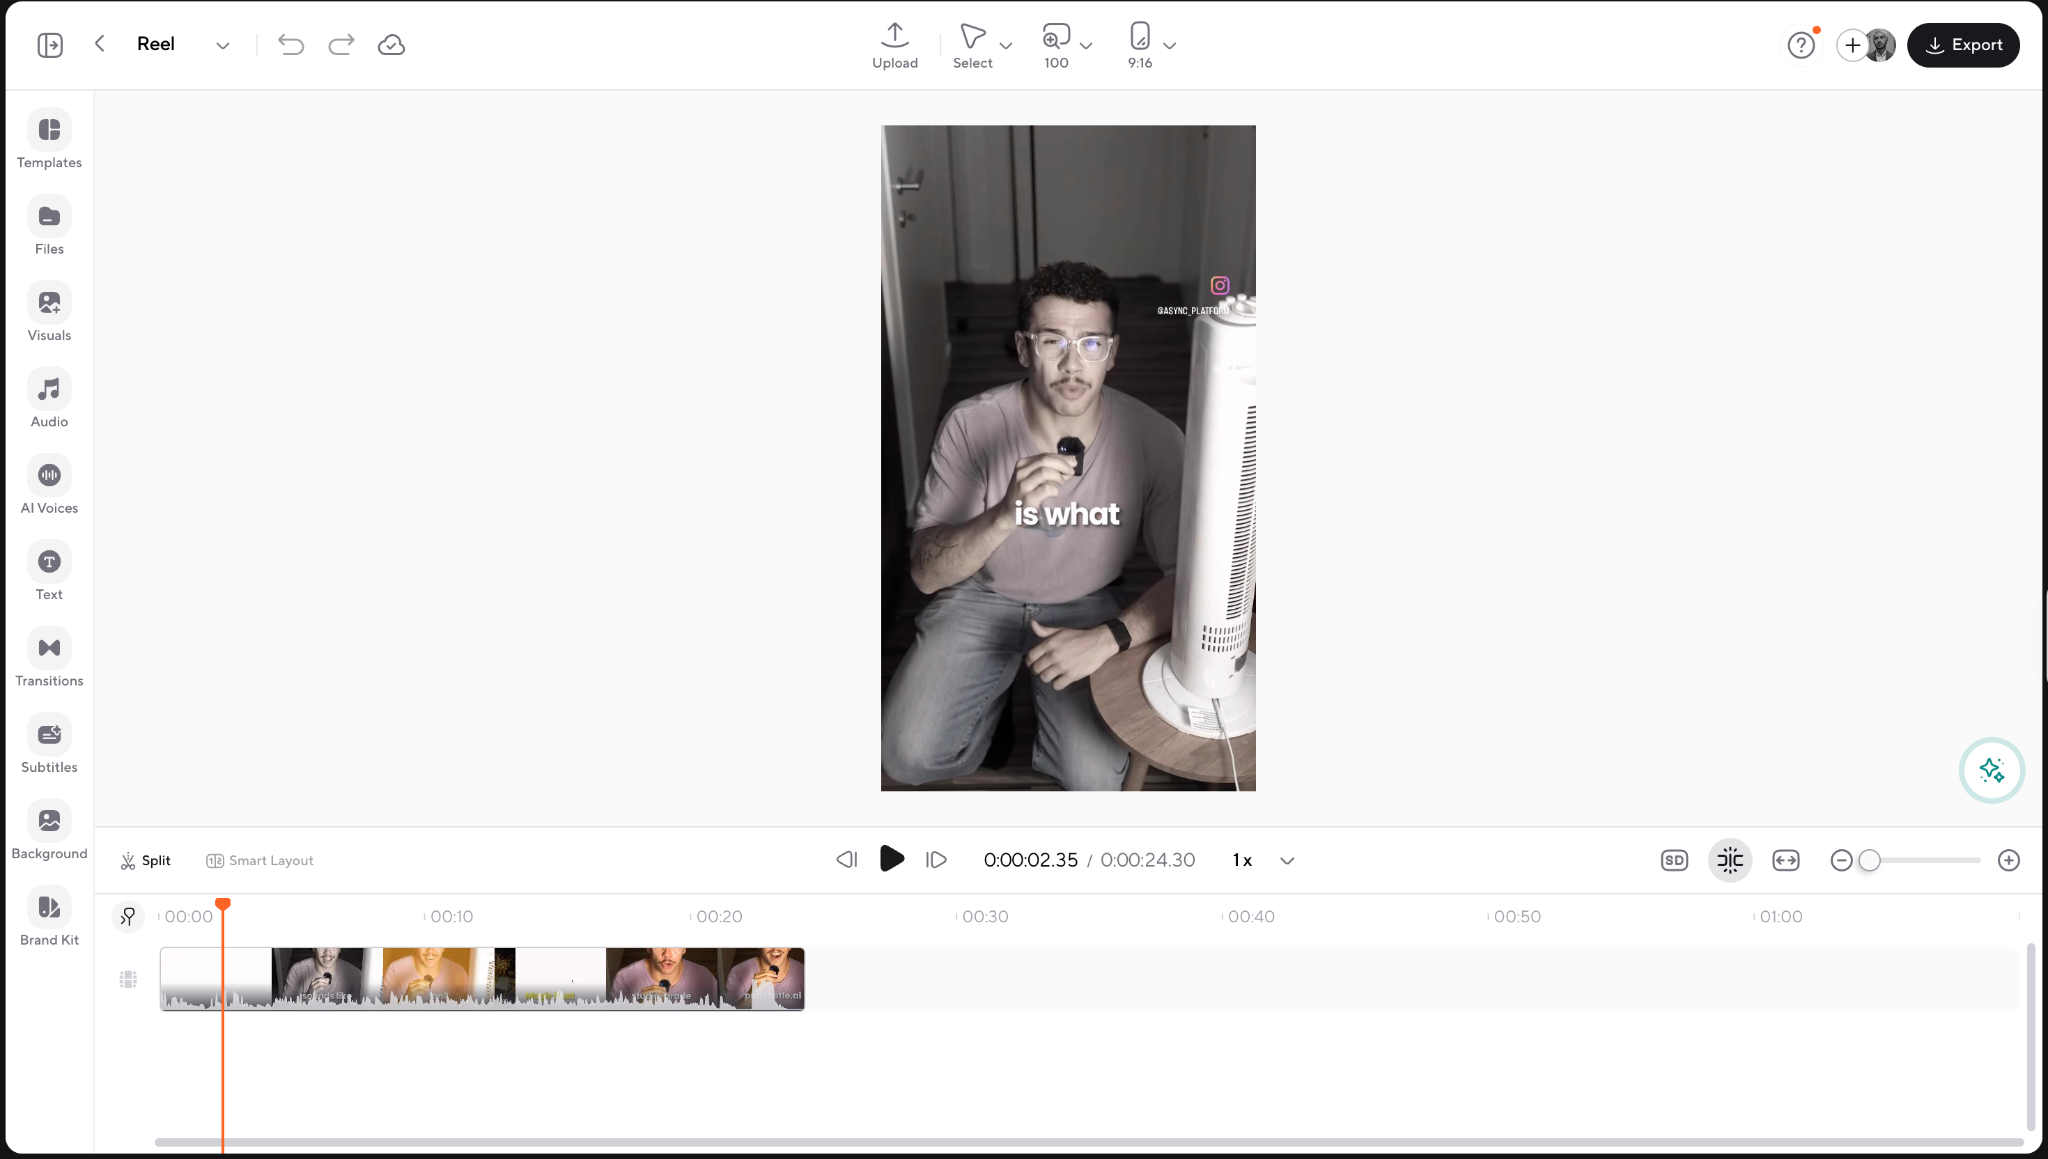
- Remove pauses and filler. Silent gaps and filler words are detected automatically. Review the flagged sections and confirm the removals rather than accepting all of them, since some pauses carry meaning.
- Tighten the cut. Edit the transcript to trim lines. Deleting text removes the matching video, which is the fastest way to apply tips 2 and 4.
- Add B-roll. Async suggests footage against the script so you can place inserts on the nouns that need showing rather than searching your library clip by clip.
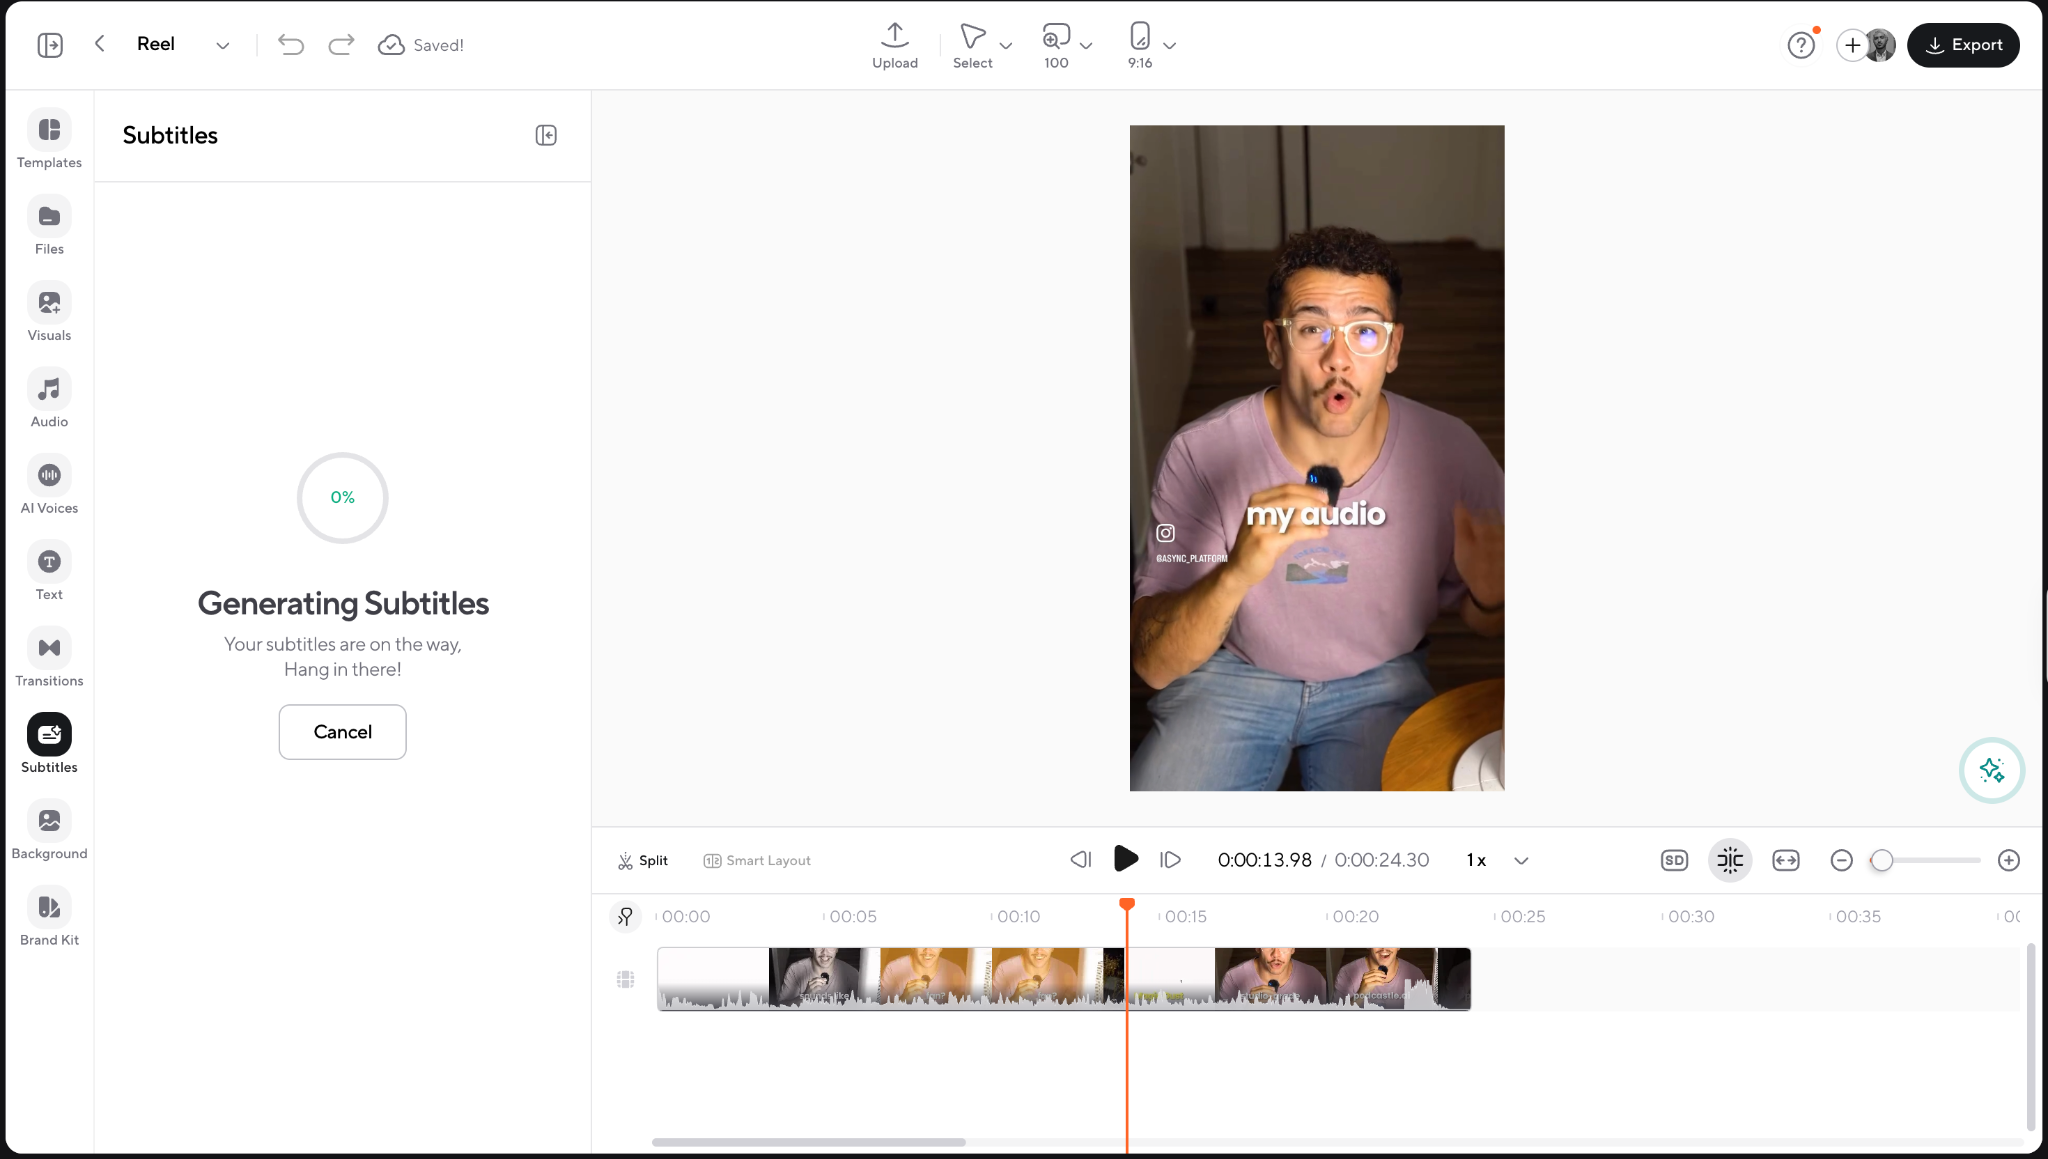
- Generate captions. Captions are created from the transcript, then styled for size, line length, and position. Set them to two or three words per line and check them against the safe area.
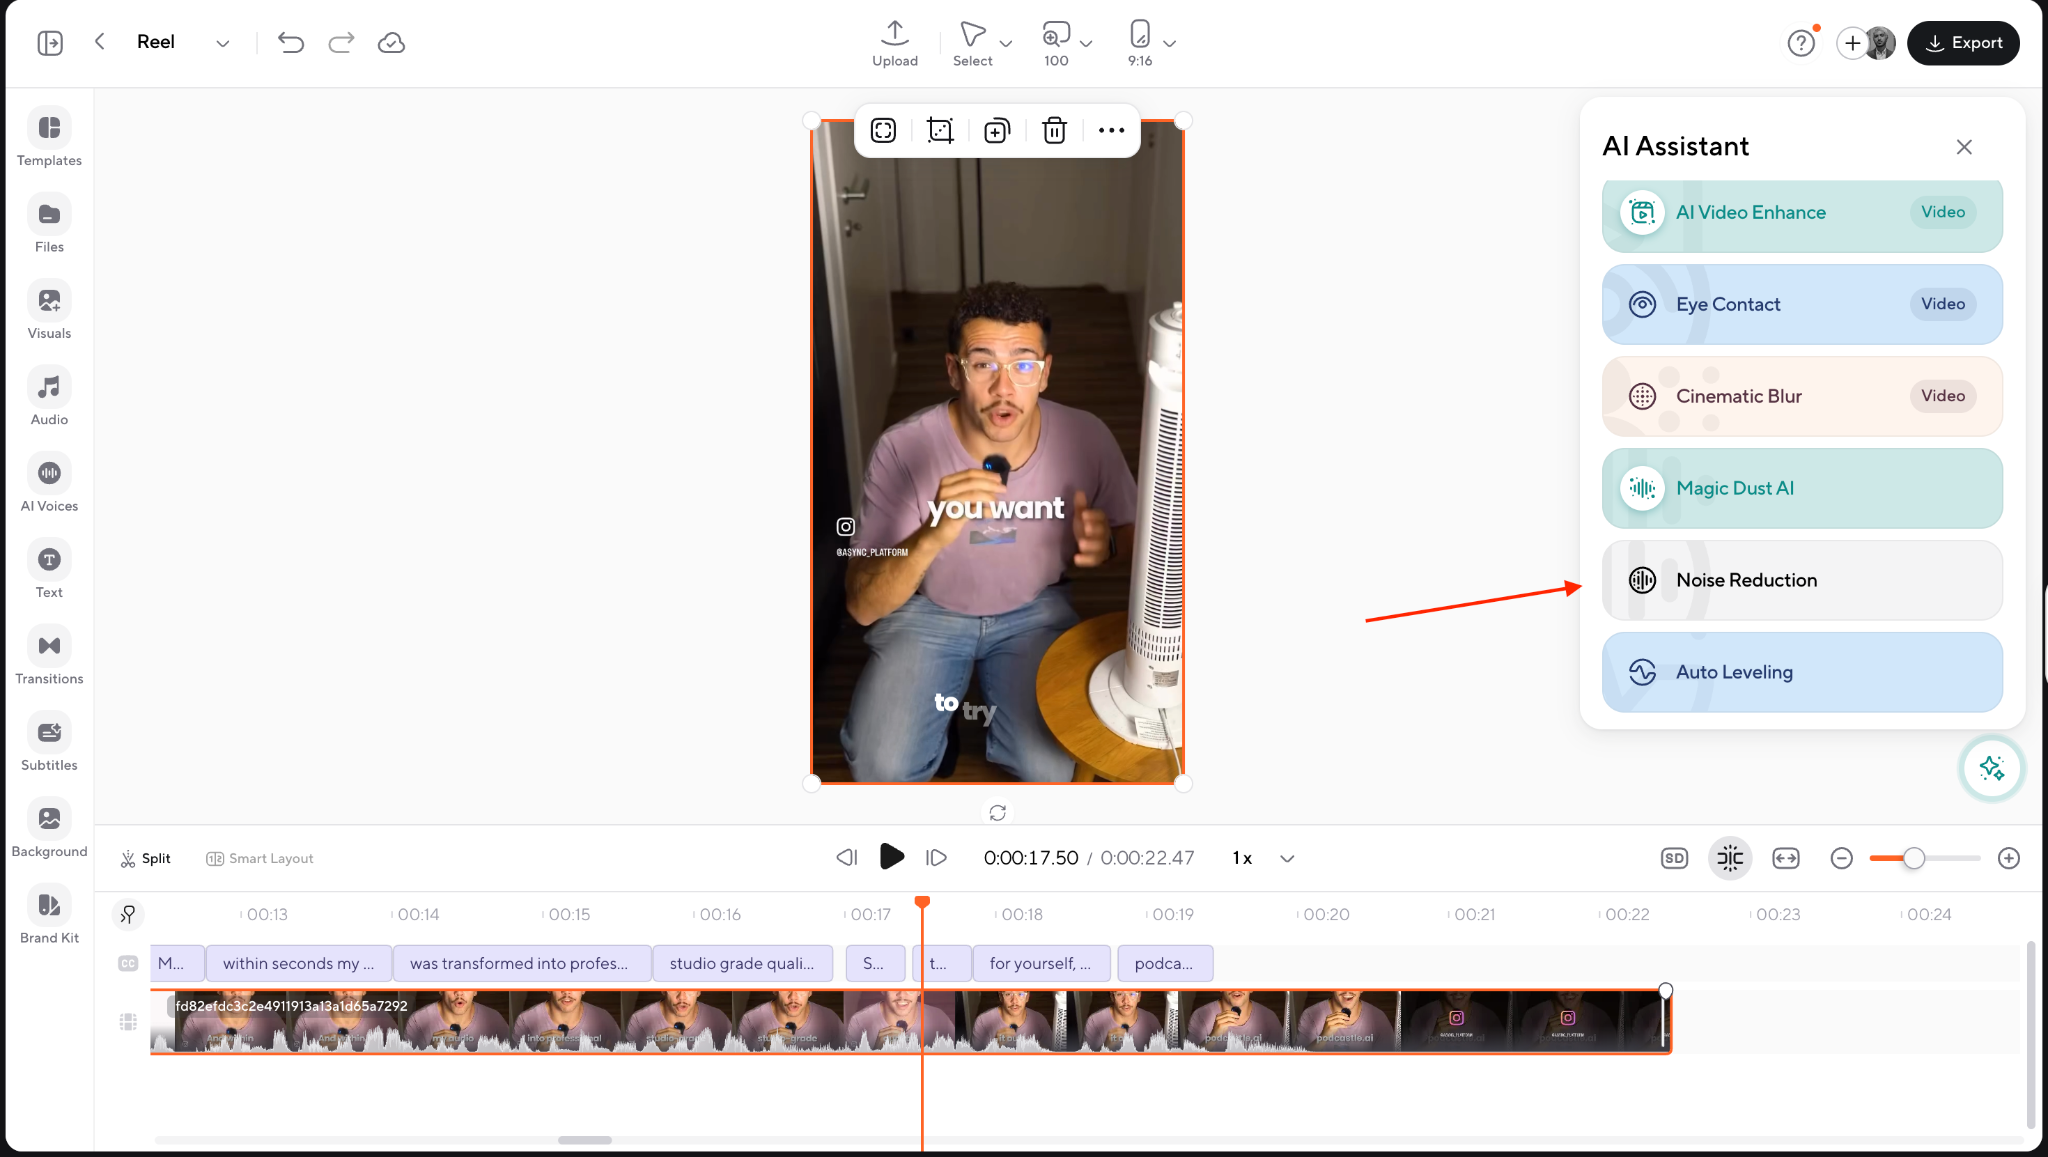
- Clean the audio. Reduce background noise, level the voice, and set music underneath speech rather than alongside it.
- Resize to vertical. Reframe to 9:16 at 1080x1920 with the subject tracked, so your framing survives the crop from horizontal footage.
- Export and review. Export, then run the mute test before publishing.
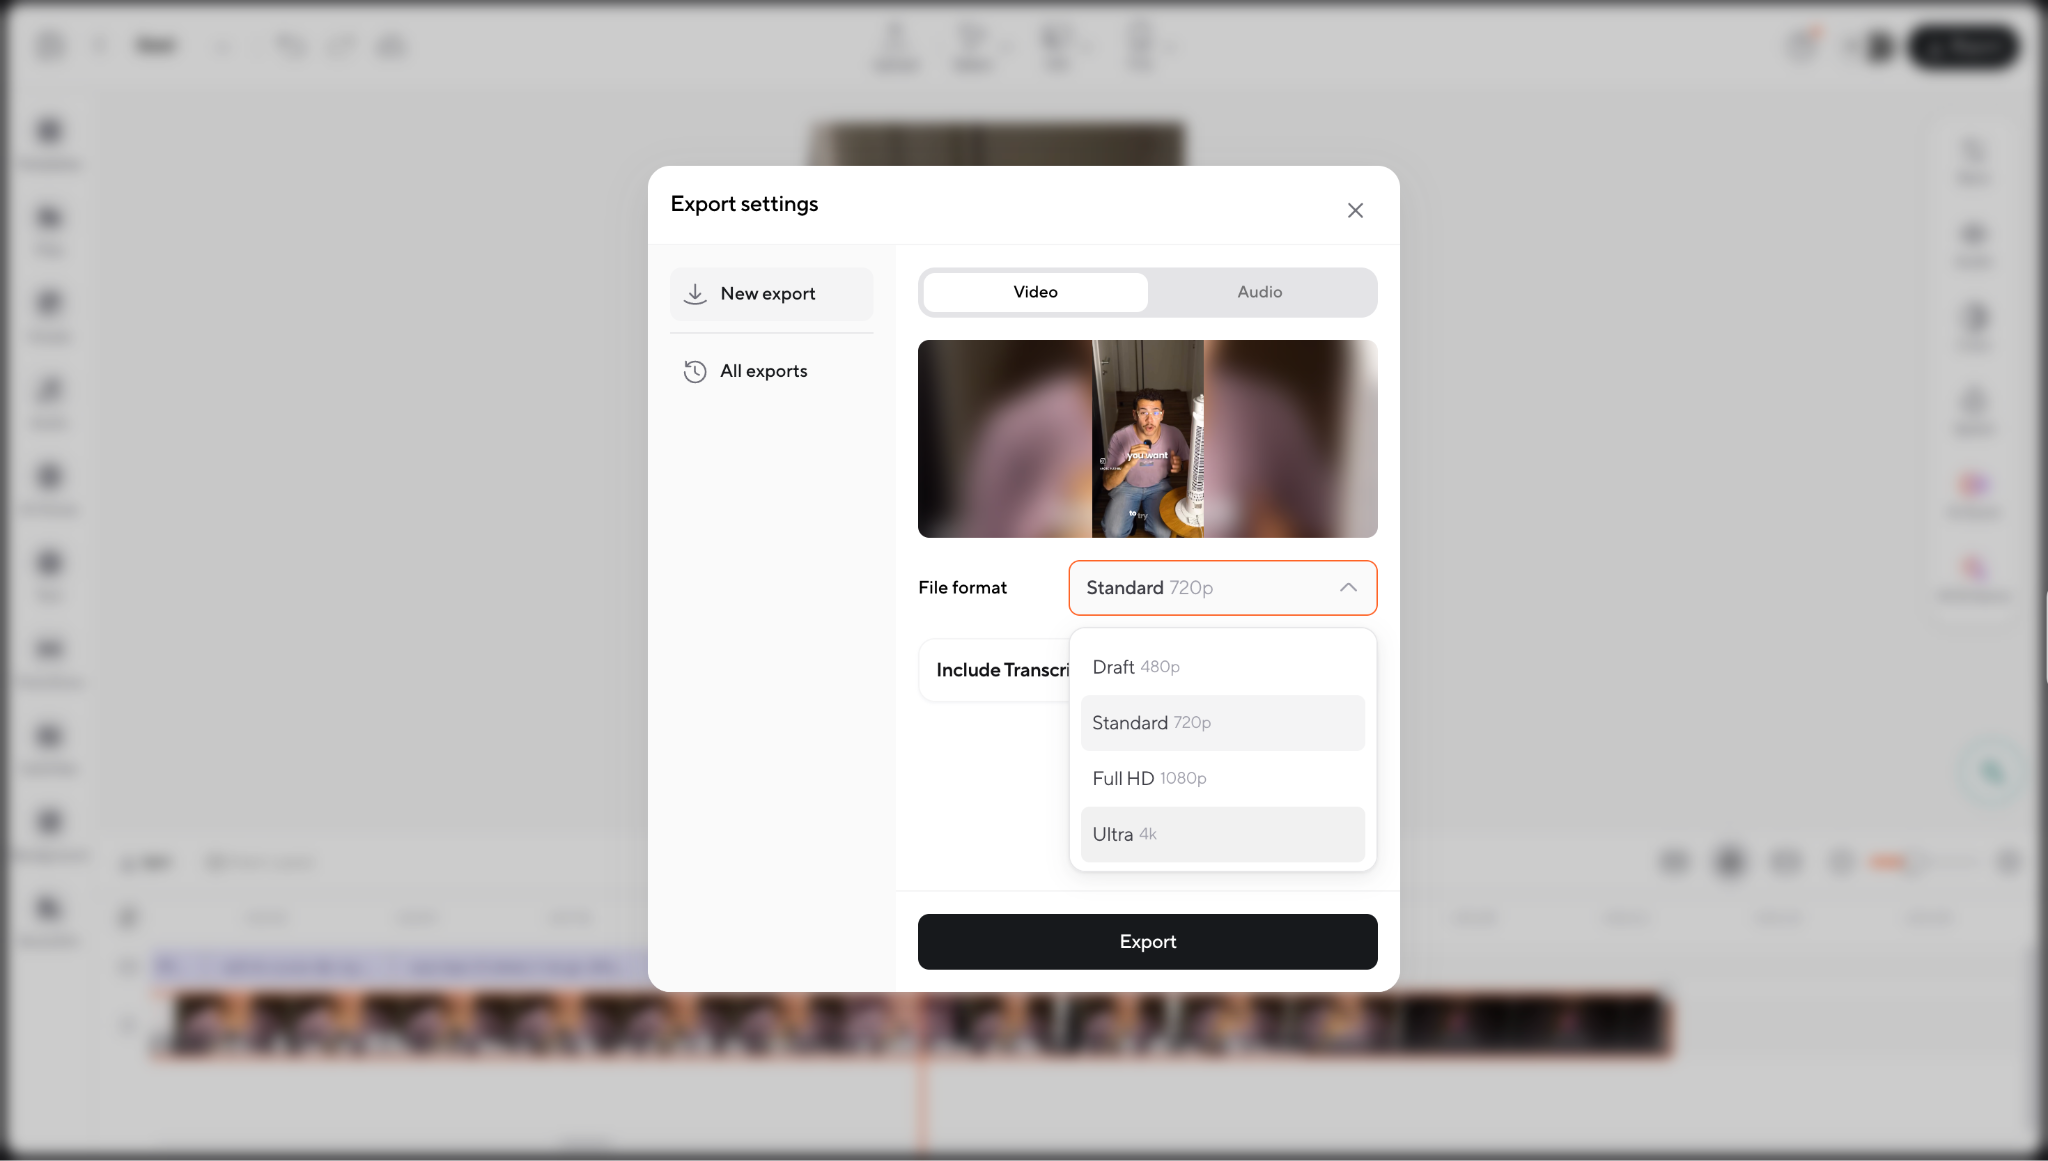
If you are producing across several platforms, the same project can be repurposed in a social media video editor workflow without recutting from scratch.
Start with one Reel
Retention editing compounds. Fix your opening, and you get more people into the middle. Tighten the middle, and more of them reach the payoff. Knowing how to edit Instagram Reels this way is mostly a habit of asking, at every second, whether the viewer is still getting something.
Pick your last Reel, check where the retention graph drops, and apply three of these Instagram Reels tips to that exact moment. If you want more on distribution once your edit is solid, see our guide on how to make Instagram Reels go viral.
Ready to try it? Upload your next Reel to Async, cut the pauses, add captions and B-roll, and export a tighter version in a few minutes.
FAQ
How do you edit Instagram Reels for better retention?
Lead with your strongest moment, cut greetings and silence, make the first frame readable with the sound off, change the visual whenever the idea changes, keep captions large and scannable, and end the moment you deliver the payoff. Then check the retention graph in Insights and re-edit the specific second where viewers left.
What is retention editing?
Retention editing is shaping a video to reduce drop-off by making each moment earn the next. It focuses on sequence, clarity, and information density rather than simply cutting faster.
How long should an Instagram Reel be?
Long enough to make the point and no longer. A single tip often works in 15 to 20 seconds, while a demonstration may need 60 or more. Instagram Reels length matters less than whether every second is doing something, and padding a short idea to hit a target number reliably hurts retention.
How often should visuals change in a Reel?
As often as the idea changes, not on a fixed interval. Some shots hold attention for eight seconds because something is developing inside them. Others lose people in two. Tie visual changes to script beats instead of a stopwatch.
Do captions improve Reel retention?
They help when a lot of viewers watch muted and when they are formatted for scanning. Two or three words per line in large type inside the safe area is much easier to follow than five dense lines near the bottom edge.
How do you find the drop-off point in a Reel?
Open the Reel in Instagram Insights and look at the retention graph. Note the timestamp where the line falls sharply, then watch that section of your edit. It is usually a static shot, an unclear caption, or a sentence that delays the point.
What is the best way to edit Reels with AI?
Use AI for the mechanical work and make the judgment calls yourself. Automatic silence removal, transcript-based trimming, caption generation, and B-roll matching save the most time. Decisions about what to open with, which moments deserve emphasis, and where to end still need you.